Update a bunch of images at once and export them as separate images using GIMP

Scaling of images can be achieved without using any scripts/extensions, but to export all images as separate image files, we need to install a plugin in GIMP named ‘Export Layers’.

You can download this plugin from the following link,

https://khalim19.github.io/gimp-plugin-export-layers/

This plugin is available for Windows, Linux, and macOS. For Windows, it can be installed using an executable file.

After installation of this plugin, restart GIMP.

Now, that we have the plugin installed, there is a very simple way to accomplish this task using the following easy steps.

  1. File > Open as layers to select all images to perform a specific task (This is one single action since the file selector allows the selection of multiple images)
  2. Image > Scale image to 75×75 to scale all layers together (We can perform many different actions similar to scaling like transforming, resizing, cropping, etc.)
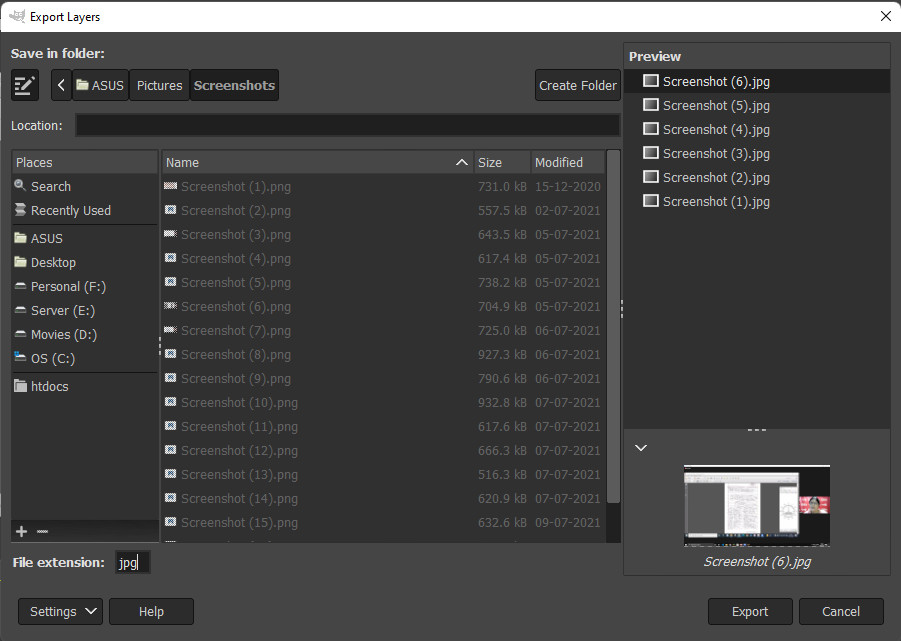
  3. File > Export Layers will open a dialog that appears allows you to choose the output folder and file extension.
Export Layers Dialog Box

The above steps will save all your image layers to separate files. This could reduce so many steps of similar tasks.

You can perform many different actions like transforming, cropping, resizing, etc. using same steps.

Setup and use a virtual python environment in Ubuntu

With virtualenvwrapper (user-friendly wrappers for the functionality of virtualenv)

Install virtualenv

Install virtualenv with

sudo apt-get install virtualenv

(for Ubuntu 14.04 (trusty) install python-virtualenv)

Install virtualenvwrapper

The reason we are also installing virtualenvwrapper is that it offers nice and simple commands to manage your virtual environments. There are two ways to install virtualenvwrapper:

As Ubuntu package (from Ubuntu 16.04)

Run sudo apt install virtualenvwrapper then run echo "source /usr/share/virtualenvwrapper/virtualenvwrapper.sh" >> ~/.bashrc

Using pip

  1. Install and/or update pip

    Install pip for Python 2 with
    sudo apt-get install python-pip

    or for Python 3
    sudo apt-get install python3-pip

    (if you use Python 3, you may need to use pip3 instead of pip in the rest of this guide).

    Optional (but recommended): 
    Turn on bash autocomplete for pip Run
    pip completion --bash >> ~/.bashrc

    and run 

    source ~/.bashrc 

    to enable.
  2. Install virtualenvwrapper Because we want to avoid sudo pip we install virtualenvwrapper locally (by default under ~/.local) with:
    pip install --user virtualenvwrapper

    and

    echo "export VIRTUALENVWRAPPER_PYTHON=/usr/bin/python3" >> ~/.bashrc
  3. Source virtualenvwrapper in .bashrc

    echo "source ~/.local/bin/virtualenvwrapper.sh" >> ~/.bashrc

Setup virtualenv and virtualenvwrapper:

First, we export the WORKON_HOME variable which contains the directory in which our virtual environments are to be stored. Let’s make this ~/.virtualenvs

export WORKON_HOME=~/.virtualenvs

now also create this directory

mkdir $WORKON_HOME

and put this export in our ~/.bashrc file so this variable gets automatically defined

echo "export WORKON_HOME=$WORKON_HOME" >> ~/.bashrc

We can also add some extra tricks like the following, which makes sure that if pip creates an extra virtual environment, it is also placed in our WORKON_HOME directory:

echo "export PIP_VIRTUALENV_BASE=$WORKON_HOME" >> ~/.bashrc

Source ~/.bashrc to load the changes

source ~/.bashrc

Test if it works

Now we create our first virtual environment. The -p argument is optional, it is used to set the Python version to use; it can also be python3 for example.

mkvirtualenv -p python2.7 test

You will see that the environment will be set up, and your prompt now includes the name of your active environment in parentheses. Also if you now run

python -c "import sys; print sys.path"

you should see a lot of /home/user/.virtualenv/... because it now doesn’t use your system site packages.

You can deactivate your environment by running

deactivate

and if you want to work on it again, simply type

workon test

Finally, if you want to delete your environment, type

rmvirtualenv test

Enjoy!
How to get the last executed query in PHP CodeIgniter?

Are you wanted to get the last executed SQL query in the CodeIgniter project? then, I will help to get the latest query in CodeIgniter

We can get the last executed query using the last_query() function of the inbuilt db class of the CodeIgniter. This function can be used with simple syntax like $this->db->last_query() to see SQL statements of last executed query in PHP CodeIgniter app. You have to simple code that functions after the main query that you wanted to check.

Here is a simple function code which can be added in any controller of the CodeIgniter project and also output for the last query:

Example:

public function check_query_function() {

    $sql = $this->db->get("products");
  
    $query = $this->db->last_query();
   
    echo "<pre>";
    print_r($query);
    exit;
}

Output:

SELECT * FROM `products`

Autostart Glassfish on startup in Ubuntu

To make the Glassfish Server auto start with startup, we need to setting up an init script, which helps us to manage all Glassfish Server startup events easily. And also make Glassfish start up automatically whenever Ubuntu is rebooting.

This script file is glassfish to be created at /etc/init.d/. For managing all Glassfish Server startup events, it ships with the asadmin tool. Use this tool in the startup script as follows,

  1. Create or edit glassfish file sudo nano /etc/init.d/glassfish
  2. Paste the following lines in the file #!/bin/sh #to prevent some possible problems export AS_JAVA=/usr/lib/jvm/jdk1.8.0 GLASSFISHPATH=/home/glassfish/bin case “$1” in start) echo “starting glassfish from $GLASSFISHPATH” sudo -u glassfish $GLASSFISHPATH/asadmin start-domain domain1 ;; restart) $0 stop $0 start ;; stop) echo “stopping glassfish from $GLASSFISHPATH” sudo -u glassfish $GLASSFISHPATH/asadmin stop-domain domain1 ;; *) echo $”usage: $0 {start|stop|restart}” exit 3 ;; esac :

Now, glassfish startup script is created. We need to add this file in startup to make Glassfish Server autostart during Ubuntu startup. Follow these steps,

  1. Make the startup script file executable sudo chmod a+x /etc/init.d/glassfish
  2. Add this file to Ubuntu startup boot sudo update-rc.d glassfish defaults

That’s it. Now, restart Ubuntu and check if it really autostart the Glassfish Server.

You can also manage Glassfish Server startup events as follows,

  • Start the server /etc/init.d/glassfish start
  • Stop the server /etc/init.d/glassfish stop
  • Restart the server /etc/init.d/glassfish restart  

Access shell with SSH on cPanel server from Linux

Some of the important server related problems will be solved only using shell access to the server. To access the cPanel server shell using SSH, there must be an SSH client installed on PC. Most of the Linux distros include SSH client software by default. If it is not installed, then it can be easily installed with following commands,

For Ubuntu: apt-get install openssh-client
For CentOS: yum install openssh-clients

After installation, follow these steps to access the cPanel shell with SSH from Linux:

  1. Login to cPanel and go to Security > SSH/Shell Access to generate SSH key pair.
  2. Click Manage SSH Keys > Generate a New Key. You should use a password to protect the key. You will be asked the password each time you use the key.
  3. In Public Keys section click ‘Manage Authorization’ and ‘Authorize’
  4. In Private Keys section click, Vew/Download then download the key (id_dsa or id_rsa) to your PC.
  5. Save it to ~/.ssh directory on your Linux machine under a meaningful name to not overwrite your existing keys for example id_dsa.myjavahost
  6. Now make sure permissions are correct on the key (one-time task) and connect:
    mypc:~$ chmod 600 .ssh/id_dsa
    mypc:~$ ssh -p1033 -i .ssh/id_dsa yourusername@yourservername
    Enter passphrase for key '.ssh/id_dsa':
  1. Provide the password for the key, set up in step #2

You should be logged in by now.