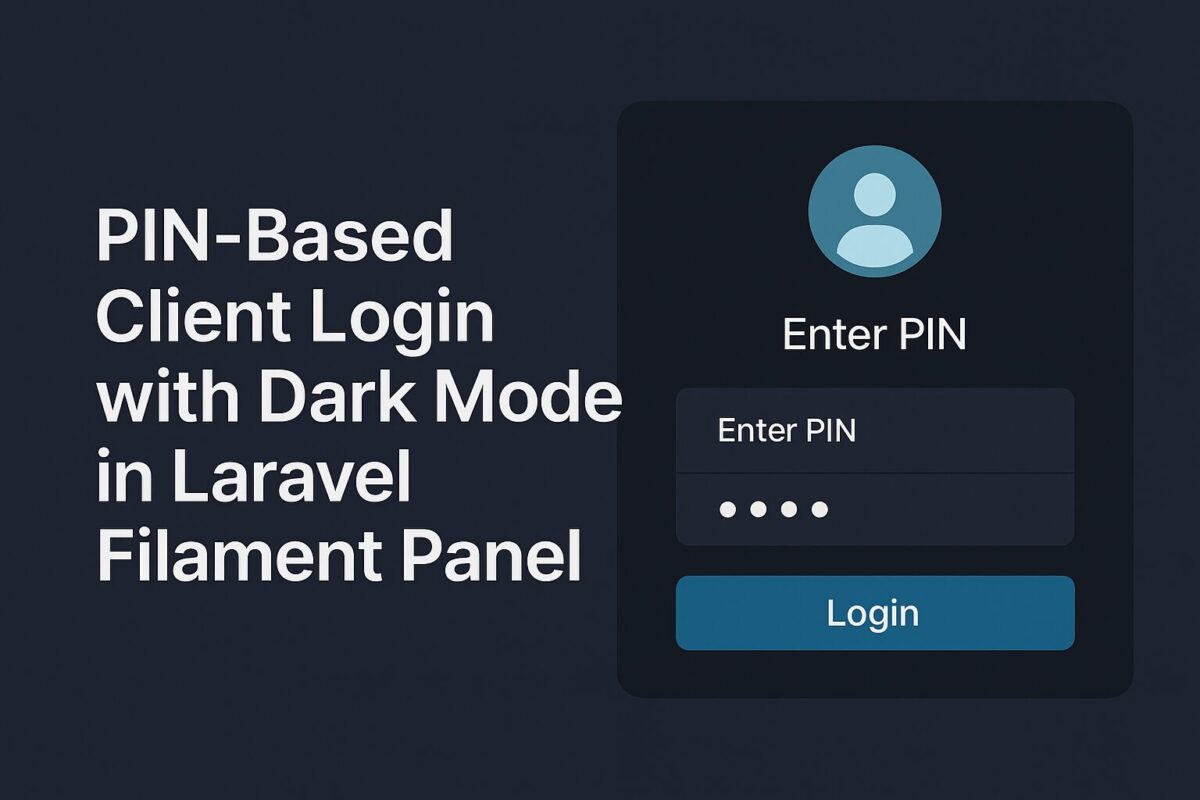
Using .env File in CodeIgniter 3

Learn how to use the .env file in CodeIgniter 3 to securely manage your environment variables and improve your application’s configuration structure.

Using environment variables via a .env file is a common best practice to keep sensitive configuration (like database credentials or any other secret or api keys) out of your codebase. .env file support is not provided in CodeIgniter 3 out of the box, but you can easily integrate it using the vlucas/phpdotenv library.

This guide will show you how to add .env file support in a CodeIgniter 3 application using the vlucas/phpdotenv library with Composer autoload enabled.

Prerequisites

Ensure your CodeIgniter project has Composer enabled by checking the following in application/config/config.php:

$config['composer_autoload'] = TRUE;

Step-by-Step Setup

The following are the steps to implement .env file support.

Step 1. Install vlucas/phpdotenv via Composer

In Codeigniter 3, composer.json is not available at the project root, but inside the application directory. So, to install any composer library, you have to first navigate to the application directory.

cd application/
composer require vlucas/phpdotenv

It will install the core files to add support for .env files.

Step 2. Create the .env File

At the root of your project (same level as index.php), create a file named .env with database configuration variables as a content:

DB_HOST=localhost
DB_USERNAME=root
DB_PASSWORD=secret
DB_NAME=my_database

3. Load the .env in index.php

Open your index.php file and add the following code before the line that bootstraps CodeIgniter:

require_once __DIR__ . '/vendor/autoload.php';

$dotenv = Dotenv\Dotenv::createImmutable(__DIR__);
$dotenv->load();

Add the above code in index.php file before the following line:

require_once BASEPATH.'core/CodeIgniter.php';

For older versions (PHP < 7.1 or Dotenv v2):

$dotenv = new Dotenv\Dotenv(__DIR__);
$dotenv->load();

This will load the .env file variables using the phpdotenv library. Now, all the variables used in .env file can be used in any code of the project.

4. Use Environment Variables in database.php

We defined the database configuration variables inside the .env file. To use these variables, open application/config/database.php and update the code as follows:

$db['default'] = array(
    'hostname' => getenv('DB_HOST'),
    'username' => getenv('DB_USERNAME'),
    'password' => getenv('DB_PASSWORD'),
    'database' => getenv('DB_NAME'),
    'dbdriver' => 'mysqli',
    'db_debug' => (ENVIRONMENT !== 'production'),
    // ... other settings
);

Note: In some cases, getenv function may not work. Use $_ENV as an alternative.

Secutiry Tip

Never commit your .env file to version control. Add it to .gitignore

Conclusion

Now your CodeIgniter 3 app can securely use environment variables just like modern frameworks. This keeps your config clean, safe, and easy to manage across environments.

Build a Custom Multi-Column Checkbox Dropdown in Filament

Learn how to build a user-friendly multi-column custom checkbox dropdown using Laravel Filament to provide improved and better selection options for your users.

Filament is a powerful admin panel for Laravel, but sometimes your UI needs go beyond its built-in fields. In this tutorial, we’ll walk through how to build a custom checkbox dropdown component in Filament that supports multiple columns and compatible with dark mode.

Goal

We want to display a dropdown that, when opened, shows a list of checkboxes (e.g. for selecting items). The checkboxes should:

  • Be selectable via checkboxes
  • Be arranged in multiple columns
  • Store selections in a Livewire model
  • Work with dark mode

The purpose for this component is, I have a list of more than 100 entries. If I take CheckboxList component, all of these entries take so much space in UI. Similarly, If I add multiselect Select component, It will not show all entries at once and user have to type name to search for entries.

So, dropdown will reduce the space in UI and checkboxes solve searching problem.

Step 1: Create the Custom Field Component

Create the filament custom checkbox dropdown field component file at app/Forms/Components/CheckboxDropdown.php and add the following code.

<?php
namespace App\Forms\Components;

use Filament\Forms\Components\Field;

class CheckboxDropdown extends Field
{
    protected string $view = 'forms.components.checkbox-dropdown';

    protected array $options = [];

    protected int $checkboxColumns = 1;

    public function options(array $options): static
    {
        $this->options = $options;
        return $this;
    }

    public function getOptions(): array
    {
        return $this->evaluate($this->options);
    }

    public function checkboxColumns(int $count): static
    {
        $this->checkboxColumns = $count;
        return $this;
    }

    public function getCheckboxColumns(): int
    {
        return $this->evaluate($this->checkboxColumns);
    }
}

Step 2: Create a blade view file for the component

As mentioned in the component class, create a custom checkbox dropdown component view file at resources/views/forms/components/checkbox-dropdown.blade.php and add the following code.

@php
$options = collect($getOptions())->mapWithKeys(fn ($label, $id) => [(string) $id => $label]);
$jsonOptions = $options->toJson();
$gridCols = match ($getCheckboxColumns()) {
    1 => 'grid-cols-1',
    2 => 'grid-cols-2',
    3 => 'grid-cols-3',
    4 => 'grid-cols-4',
    default => 'grid-cols-1',
};
@endphp

<div
    x-data="{
        open: false,
        toggle() { this.open = !this.open },
        selected: @js($getState() ?? []),
        liveSelected: @entangle($attributes->wire('model')).defer,
        options: {{ $jsonOptions }} || {},
        isSelected(id) {
            return this.selected?.includes(id);
        },
        labelFor(id) {
            if (!this.options || typeof this.options !== 'object') return id;
            return this.options[id] ?? id;
        }
    }"
    class="relative">
    <!-- Trigger Button -->
    <button
        type="button"
        @click="toggle"
        class="w-full border rounded px-3 py-2 text-left bg-white dark:bg-gray-900 border-gray-300 dark:border-gray-700 text-gray-800 dark:text-gray-200 shadow-sm">
        <template x-if="selected?.length">
            <span x-text="selected.map(labelFor).join(', ')"></span>
        </template>
        <template x-if="!selected?.length">
            <span class="text-gray-400 dark:text-gray-500">Select items...</span>
        </template>
    </button>

    <!-- Dropdown Panel -->
    <div
        x-show="open"
        @click.away="open = false"
        x-cloak
        class="absolute z-10 w-full mt-1 rounded border bg-white dark:bg-gray-900 border-gray-300 dark:border-gray-700 shadow max-h-60 overflow-y-auto">
        <ul class="p-2 grid {{ $gridCols }} space-y-1 gap-2">
            <template x-for="(label, id) in options" :key="id">
                <li>
                    <label class="flex gap-2 items-start space-x-2 text-gray-800 dark:text-gray-200">
                        <input
                            type="checkbox"
                            class="fi-checkbox-input rounded border-none bg-white shadow-sm ring-1 transition duration-75 checked:ring-0 focus:ring-2 focus:ring-offset-0 disabled:pointer-events-none disabled:bg-gray-50 disabled:text-gray-50 disabled:checked:bg-gray-400 disabled:checked:text-gray-400 dark:bg-white/5 dark:disabled:bg-transparent dark:disabled:checked:bg-gray-600 text-primary-600 ring-gray-950/10 focus:ring-primary-600 checked:focus:ring-primary-500/50 dark:text-primary-500 dark:ring-white/20 dark:checked:bg-primary-500 dark:focus:ring-primary-500 dark:checked:focus:ring-primary-400/50 dark:disabled:ring-white/10 mt-1"
                            :value="id"
                            :checked="isSelected(id)"
                            @change="
                                if (isSelected(id)) {
                                    selected = selected.filter(i => i !== id)
                                } else {
                                    selected.push(id)
                                }
                                liveSelected = selected;
                            ">
                        <span x-text="label"></span>
                    </label>
                </li>
            </template>
        </ul>
    </div>
</div>

Now this component id ready to use. Currently, it can adopt current filament admin panel theme and you can distribute checkboxes to multiple columns using checkboxColumns option.

Step 3: Usage in Filament Resource

You can use this custom checkbox dropdown component in any resource file as follows:

CheckboxDropdown::make('selected_items')
    ->label('Select Items')
    ->options(Item::pluck('name', 'id')->toArray())
    ->checkboxColumns(3)

Conclusion

With this setup, you can develop a fully reusable, dynamic, and user-friendly multi-column checkbox dropdown — perfect for any Laravel Filament project.

Guide to Integrate FullCalendar in Laravel Filament Widgets

Laravel Filament provides a fantastic administrative panel builder for Laravel applications. When it comes to displaying dynamic events, tasks, or schedules, integrating a robust calendar solution like FullCalendar is a common requirement. This post will guide you through adding FullCalendar to your Laravel Filament widgets, highlighting key configurations and, crucially, providing solutions to common errors you might encounter.

Why FullCalendar in Laravel Filament?

FullCalendar is a versatile JavaScript calendar library that allows you to create interactive and customizable calendars. Integrating it into Filament widgets empowers you to build powerful dashboards for:

  • Event Management: Displaying conferences, webinars, or social events.
  • Task Scheduling: Visualizing project timelines and deadlines.
  • Resource Booking: Showing availability of rooms, equipment, or staff.
  • Appointment Management: For clinics, salons, or service-based businesses.

The easiest way to achieve this integration is by using the excellent saade/filament-fullcalendar plugin.

Prerequisites

  • Laravel v10+ Installed
  • Filament v3+ Installed with Panel builder

Step 1: Installation and Basic Setup

First, ensure you have a Laravel Filament project set up. Then, install the fullcalendar plugin via Composer:

composer require saade/filament-fullcalendar:^3.0

After installation, this plugin needs to be registered in your Filament panel provider, typically app/Providers/Filament/AdminPanelProvider.php:

use Saade\FilamentFullCalendar\FilamentFullCalendarPlugin;
use Filament\Panel;
use Filament\PanelProvider;

class AdminPanelProvider extends PanelProvider
{
    public function panel(Panel $panel): Panel
    {
        return $panel
            // ... other panel configurations
            ->plugins([
                FilamentFullCalendarPlugin::make()
                    // You can add global configurations here, e.g., ->selectable(true)
            ]);
    }
}

Step 2: Implementing the Calendar Widget

Now, generate a new Filament widget for your calendar:

php artisan make:filament-widget CalendarWidget

It will create a file app/Filament/Widgets/CalendarWidget.php. Update this file to extend Saade\FilamentFullCalendar\Widgets\FullCalendarWidget.

namespace App\Filament\Widgets;

use Saade\FilamentFullCalendar\Widgets\FullCalendarWidget;
use Illuminate\Database\Eloquent\Model; // If you're fetching from a model
use App\Models\Event; // Example: Replace with your event model

class CalendarWidget extends FullCalendarWidget
{
    // If you have a dedicated model for events, you can specify it here.
    // This allows for default create/edit/delete actions.
    public Model | string | null $model = Event::class; // Replace 'Event::class' with your actual model

    /**
     * FullCalendar will call this function whenever it needs new event data.
     * This is triggered when the user clicks prev/next or switches views on the calendar.
     *
     * @param array $fetchInfo An array containing 'start', 'end', and 'timezone' for the current view.
     * @return array
     */
    public function fetchEvents(array $fetchInfo): array
    {
        // Example: Fetch events from your 'Event' model within the visible date range
        return Event::query()
            ->where('start_date', '>=', $fetchInfo['start']) // Assuming 'start_date' and 'end_date' columns
            ->where('end_date', '<=', $fetchInfo['end'])
            ->get()
            ->map(fn (Event $event) => [
                'id' => $event->id,
                'title' => $event->name, // Replace with your event title column
                'start' => $event->start_date, // Replace with your event start date column
                'end' => $event->end_date,     // Replace with your event end date column
                // You can add more FullCalendar event properties here
                // 'url' => EventResource::getUrl(name: 'view', parameters: ['record' => $event]),
                // 'shouldOpenUrlInNewTab' => true,
                // 'color' => '#f00',
            ])
            ->toArray();
    }

    /**
     * You can customize FullCalendar options by overriding the config method.
     */
    public function config(): array
    {
        return [
            'initialView' => 'dayGridMonth',
            'headerToolbar' => [
                'left' => 'prev,next today',
                'center' => 'title',
                'right' => 'dayGridMonth,timeGridWeek,timeGridDay',
            ],
            // ... more FullCalendar options
            // 'editable' => true, // Enable dragging and resizing if your model allows
            // 'selectable' => true, // Enable date selection to create new events
        ];
    }
}

Key Components:

  • $model Property: Crucial for the plugin’s built-in actions (create, edit, view, delete) to understand which database model your events belong to.
use App\Models\Event; // Make sure your Event model exists

class CalendarWidget extends FullCalendarWidget
{
    public Model | string | null $model = Event::class;
    // ...
}
  • fetchEvents(array $fetchInfo): This method is called by FullCalendar to retrieve event data for the currently displayed date range. You should query your database and return an array of event objects, each with at least id, title, start, and end properties.
public function fetchEvents(array $fetchInfo): array
{
    return Event::query()
        ->where('start_date', '>=', $fetchInfo['start'])
        ->where('end_date', '<=', $fetchInfo['end'])
        ->get()
        ->map(fn (Event $event) => [
            'id' => $event->id,
            'title' => $event->name,
            'start' => $event->start_date,
            'end' => $event->end_date,
            // Add more properties like 'color', 'classNames', 'url' etc.
        ])
        ->toArray();
}
  • config(): array: This method is where you configure all of FullCalendar’s JavaScript options for your specific widget instance (e.g., initial view, toolbar buttons, event display format, etc.).
public function config(): array
{
    return [
        'initialView' => 'dayGridMonth',
        'headerToolbar' => [
            'left' => 'prev,next today',
            'center' => 'title',
            'right' => 'dayGridMonth,timeGridWeek,timeGridDay',
        ],
        // 'selectable' => true, // Allows clicking/dragging to select dates
        // 'editable' => true,   // Allows dragging/resizing events
        // ... many more FullCalendar options
    ];
}

Step 3: Final Touches

Add the Widget: Ensure your CalendarWidget::class is listed in the widgets options of your app/Providers/Filament/AdminPanelProvider.php to display it on the dashboard.

use App\Filament\Widgets\CalendarWidget;
use Saade\FilamentFullCalendar\FilamentFullCalendarPlugin;
use Filament\Panel;
use Filament\PanelProvider;

class AdminPanelProvider extends PanelProvider
{
    public function panel(Panel $panel): Panel
    {
        return $panel
            // ... other panel configurations
            ->widgets([
                CalendarWidget::class, // add your calendar widget class here
            ])
            ->plugins([
                FilamentFullCalendarPlugin::make()
                    // You can add global configurations here, e.g., ->selectable(true)
            ]);
    }
}

Composer Autoload & Cache: After any class changes or file movements, always run the following commands:

composer dump-autoload
php artisan optimize:clear
php artisan filament:clear-cached-components # Useful for Filament-specific cache

Verify Data: Use dd() liberally in your fetchEvents() and mountUsing() methods to inspect the data being passed, especially id values, to ensure they match your database primary keys. So, you can extend the development to open event view panel on any event click.

Conclusion

By following these steps, you can successfully integrate and customize FullCalendar within your FilamentPHP widgets, creating a powerful and interactive event management dashboard. For more advanced configurations, always refer to the official FullCalendar documentation
and the saade/filament-fullcalendar plugin’s GitHub repository.

Add Missing Migrations to Laravel Database Without executing

Learn how to add missing Laravel migration entries to the database without re-running them. Perfect for restoring synced environments or imported databases.

Sometimes, when working with Laravel projects, especially when migrating databases manually or syncing environments, the migrations table might miss entries — even though the migration files exist and were executed. This causes Laravel to attempt to re-run migrations or show them as pending. And even sometime, you added new migration and try to migrate them, but migration gives error that previous migrations are pending.

This article will guide you through creating an Artisan command that adds missing migration entries to the database without running them, keeping Laravel in sync with the actual DB schema.

Step 1: Create the Command

To create an artisan command, run the following command in your terminal:

php artisan make:command SyncMigrations

It creates a file at app/Console/Commands/SyncMigrations.php.

Step 2: Add the Logic

Now, open this file and paste the following code inside it:

<?php

namespace App\Console\Commands;

use Illuminate\Console\Command;
use Illuminate\Support\Facades\DB;
use Illuminate\Support\Facades\File;

class SyncMigrations extends Command
{
    protected $signature = 'sync:migrations';
    protected $description = 'Add missing migrations to the migrations table without running them';

    public function handle()
    {
        $migrationPath = database_path('migrations');
        $files = File::files($migrationPath);

        $fileMigrations = collect($files)->map(function ($file) {
            return pathinfo($file->getFilename(), PATHINFO_FILENAME);
        });

        $existingMigrations = DB::table('migrations')->pluck('migration');

        $missingMigrations = $fileMigrations->diff($existingMigrations);

        if ($missingMigrations->isEmpty()) {
            $this->info('All migrations are already recorded.');
            return 0;
        }

        $lastBatch = DB::table('migrations')->max('batch') ?? 0;
        $nextBatch = $lastBatch + 1;

        foreach ($missingMigrations as $migration) {
            DB::table('migrations')->insert([
                'migration' => $migration,
                'batch' => $nextBatch,
            ]);
            $this->line("Added migration: <info>$migration</info>");
        }

        $this->info("Added " . $missingMigrations->count() . " missing migration(s) to batch $nextBatch.");
        return 0;
    }
}

Explanation:

  • Get all filenames list from the migrations folder.
  • Get all migrations list from the migrations table.
  • Check a difference between two lists and return 0 if no difference found.
  • If there is a difference, get a last migration batch and create new batch by adding 1 to this batch number.
  • Add all migrations available in the difference with new batch number.

Step 3: Run the Command

If you are running Laravel < 11, register the command file in app/Console/Kernel.php:

protected $commands = [
    \App\Console\Commands\SyncMigrations::class,
];

In Laravel 11+, there’s no need to register commands manually.

Now, run the following command in your terminal:

php artisan sync:migrations

You’ll see output like this:

Added migration: 2024_12_31_235959_create_users_table
Added migration: 2025_01_01_000000_create_orders_table
Added 2 missing migration(s) to batch 4.

Caution

This command does not execute the migrations. It assumes the database schema already reflects them. Use this only when you’re sure the migrations were already applied, e.g. from another environment or a database import.

Conclusion

This approach is a safe and Laravel-friendly way to fix out-of-sync migrations. It’s perfect for developers working across multiple environments or restoring production databases.

Want to take it further? Add a prompt or backup feature to this command. Let me know in the comments!