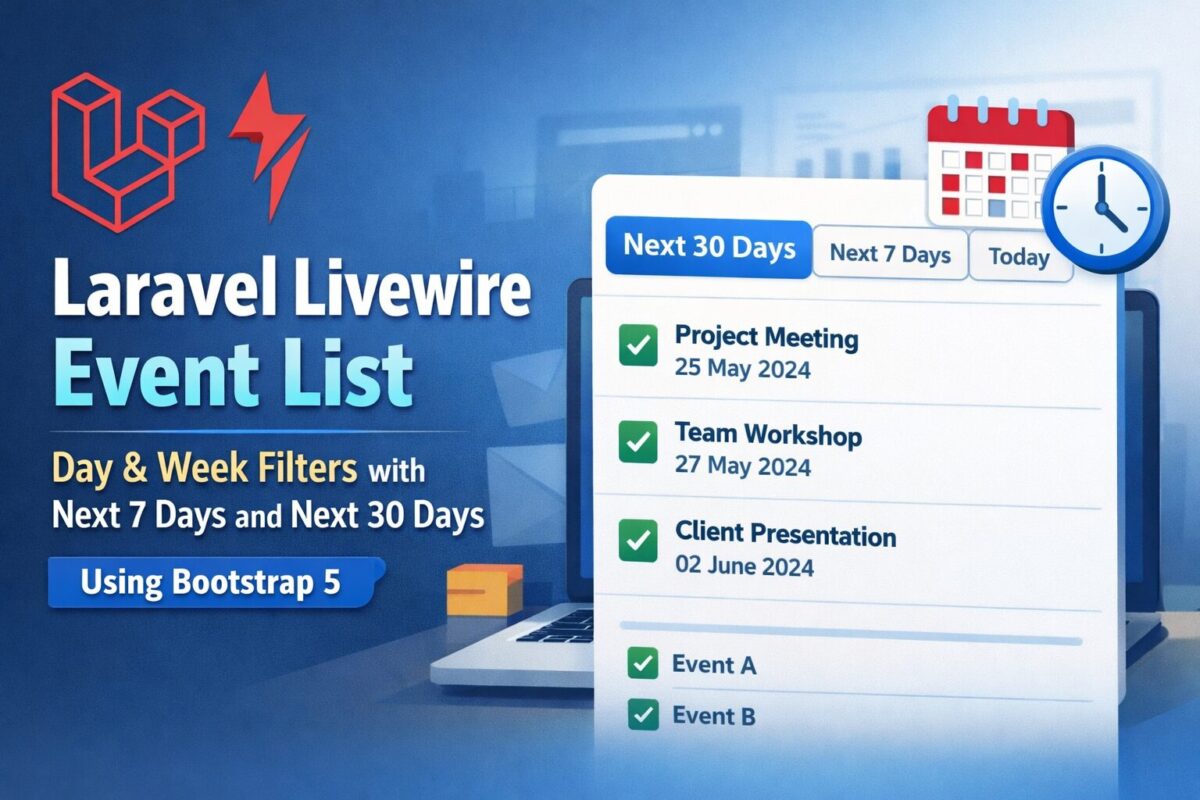
How to Reset a Forgotten phpMyAdmin Password

Forgot your phpMyAdmin password? Follow this simple guide to reset your MySQL root or user password and regain access to phpMyAdmin on localhost or server.

Forgetting your phpMyAdmin password can be frustrating, especially when you’re in the middle of working on a critical project. Fortunately, resetting the password is a straightforward process. This guide walks you through the steps needed to reset your phpMyAdmin (MySQL/MariaDB) root password on a local or remote server.

Step-by-Step Guide to Reset phpMyAdmin Root Password

Step 1: Stop the MySQL Service

Before making any changes, stop the MySQL or MariaDB service.

sudo systemctl stop mysql

Step 2: Start MySQL in Safe Mode

Run MySQL in safe mode without password authentication.

sudo mysqld_safe --skip-grant-tables &

This allows you to log in without needing a password.

Step 3: Log in to MySQL

Now log into MySQL as the root user:

mysql -u root

You’ll be taken directly to the MySQL shell.

Step 4: Change the Root Password

Run the following commands to change the root password.

For MySQL 5.7+ or MariaDB 10.1+:

FLUSH PRIVILEGES;
ALTER USER 'root'@'localhost' IDENTIFIED BY 'your_new_password';

For older versions:

USE mysql;
UPDATE user SET password=PASSWORD('your_new_password') WHERE User='root';
FLUSH PRIVILEGES;

Replace 'your_new_password' with your desired password.

Step 5: Stop MySQL Safe Mode and Restart Normally

Press Ctrl+C to stop the MySQL safe mode process (if it’s running in foreground), or kill it using:

sudo killall -9 mysqld_safe
sudo killall -9 mysqld

Then start the service again:

sudo systemctl start mysql

Step 6: Test Login to phpMyAdmin

Go to http://localhost/phpmyadmin or your server’s phpMyAdmin URL and log in using:

  • Username: root
  • Password: the new password you just set

If successful, you’re good to go!

Tips for Better Security

  • Avoid using the root account for daily tasks. Create a separate user with limited privileges.
  • Use strong, unique passwords and store them securely using a password manager.
  • Regularly update MySQL/MariaDB and phpMyAdmin for security patches.

Common Issues & Fixes

Issue: Access denied for user 'root'@'localhost'
Fix: Ensure you flushed privileges and restarted the MySQL server after changing the password.

Issue: phpMyAdmin login loop
Fix: Check config.inc.php in your phpMyAdmin directory. Ensure $cfg['Servers'][$i]['auth_type'] is set to 'cookie'.

Conclusion

Resetting a forgotten phpMyAdmin password isn’t difficult when you follow the correct steps. Always remember to restart the MySQL service after resetting the password and ensure your configuration files are properly set. Keeping your credentials secure and using non-root accounts for regular usage can further enhance your database security.

How to Use TinyMCE with Livewire and Sortable.js in a Dynamic Form Builder

Learn how to integrate TinyMCE with Livewire and Sortable.js in a dynamic form builder. Build interactive forms with drag-and-drop and rich text editing in Laravel.

When building a drag-and-drop form builder with Laravel Livewire, a common challenge is integrating rich text editors like TinyMCE while also supporting sortable components and repeaters.

Checkout my article to build dynamic form builder using Laravel Livewire here.

This guide walks you through a working setup where:

  • Components can be added dynamically.
  • Fields can include TinyMCE editors.
  • Components can be dragged and reordered using Sortable.js.
  • TinyMCE properly initializes and syncs data back to Livewire.

Step 1: Create Your TinyMCE Field Partial

Inside your Blade view for form fields, create a partial for TinyMCE:

<div wire:ignore>
    <textarea
        id="{{ $editorId }}"
        class="tinymce"
        data-model="{{ $modelPath }}"
    >{{ is_string($value) ? $value : '' }}</textarea>
</div>
  • wire:ignore ensures Livewire doesn’t overwrite the editor.
  • data-model stores the Livewire binding path for syncing.

Step 2: Add TinyMCE + Sortable.js JavaScript

Include TinyMCE and Sortable.js in your layout:

<script src="https://cdn.tiny.cloud/1/no-api-key/tinymce/6/tinymce.min.js" referrerpolicy="origin"></script>
<script src="https://cdn.jsdelivr.net/npm/sortablejs@1.15.0/Sortable.min.js"></script>

Now initialize editors and handle drag-and-drop:

<script>
    function initTinyMCEEditors() {
        document.querySelectorAll('textarea.tinymce').forEach((el) => {
            if (!el.id || tinymce.get(el.id)) return;

            tinymce.init({
                selector: `#${el.id}`,
                menubar: false,
                plugins: 'link lists code image table',
                toolbar: 'undo redo | bold italic underline | alignleft aligncenter alignright | bullist numlist | link image code',
                setup: function (editor) {
                    editor.on('init', () => {
                        editor.setContent(el.value || '');
                    });
                    editor.on('Change KeyUp', () => {
                        const model = el.dataset.model;
                        if (model) {
                            Livewire.dispatch('input', { name: model, value: editor.getContent() });
                        }
                    });
                }
            });
        });
    }

    function destroyTinyMCEEditors() {
        document.querySelectorAll('textarea.tinymce').forEach((el) => {
            const editor = tinymce.get(el.id);
            if (editor) {
                editor.destroy();
            }
        });
    }

    function syncAllTinyMCEDataToLivewire() {
        document.querySelectorAll('textarea.tinymce').forEach((el) => {
            const editor = tinymce.get(el.id);
            if (editor) {
                const model = el.dataset.model;
                if (model) {
                    Livewire.dispatch('input', { name: model, value: editor.getContent() });
                }
            }
        });
    }

    document.addEventListener('DOMContentLoaded', function () {
        const el = document.getElementById('components-sortable');

        if (el) {
            new Sortable(el, {
                animation: 150,
                handle: '.drag-handle',
                onStart: destroyTinyMCEEditors,
                onEnd: () => {
                    setTimeout(() => {
                        Livewire.dispatch('reorderUpdated');
                        initTinyMCEEditors();
                    }, 100);
                }
            });
        }

        initTinyMCEEditors();
        Livewire.hook('message.processed', initTinyMCEEditors);
    });
</script>

Step 3: Sortable Container Blade Example

<ul id="components-sortable">
    @foreach ($components as $index => $component)
        <li class="component-item">
            <div class="drag-handle cursor-move">⠿</div>

            @include('form-fields', [
                'fields' => $component['fields'],
                'modelPath' => "components.{$index}.fields"
            ])
        </li>
    @endforeach
</ul>

Step 4: Sync TinyMCE Data Before Save

Since TinyMCE keeps data internally, Livewire won’t automatically have the latest content.

Fix this by syncing before save:

<button type="button" onclick="syncAllTinyMCEDataToLivewire(); Livewire.find('{{ $this->id }}').save()">Save</button>

And in your Livewire component:

protected $listeners = ['save-form' => 'save'];

public function save()
{
    // At this point, TinyMCE data is synced
}

Conclusion

Integrating TinyMCE with Livewire and Sortable.js in a dynamic form builder may seem complex at first, but once set up correctly, it opens up powerful possibilities for building highly interactive and user-friendly applications. By combining the real-time reactivity of Livewire, the drag-and-drop flexibility of Sortable.js, and the rich editing features of TinyMCE, you can create a seamless experience where users can easily manage, reorder, and edit dynamic content without page reloads.

This approach not only improves usability but also ensures that your forms remain scalable and maintainable as your project grows. With the right configuration and careful handling of event updates, you’ll have a robust solution ready for production.

Mastering CSS Media Queries: Optimizing for Retina & Touch Devices

Learn how to use advanced CSS media queries to optimize sliders for Retina iPhones, high-DPI devices, and hybrid touchscreens.

When building responsive websites, CSS media queries are your best friend. They let you fine-tune layouts for different devices, screen sizes, resolutions, and input types. But sometimes media queries can look complicated — especially when dealing with device widths, pixel ratios, and hover/pointer detection.

In this post, we’ll break down three CSS media queries that are often used to optimize sliders (.ftslider) for iPhones, high-density screens, and hybrid touch devices. By the end, you’ll understand exactly what each query targets, why it’s written that way, and how it affects your design.

Targeting iPhone X–Style Devices

@media only screen and (min-device-width: 375px) and (max-device-width: 812px) 
and (-webkit-min-device-pixel-ratio: 3) {
  .ftslider { height: calc(90vh - 85px); }
}

The above @media query targets iPhone X–style devices (and similar), because:

  • min-device-width: 375px – the device width is at least 375px.
  • max-device-width: 812px – the device width is at most 812px.
    • This matches iPhones in the 375×812 portrait range (like iPhone X, XS, 11 Pro, etc.).
  • -webkit-min-device-pixel-ratio: 3 → ensures the device has a Retina 3x screen density.

Handling High-Resolution Displays (Cross-Browser)

@media only screen and (-webkit-min-device-pixel-ratio: 3),
only screen and (-o-min-device-pixel-ratio: 3/1),
only screen and (min-resolution: 458dpi),
only screen and (min-resolution: 3dppx) {
  .ftslider { height: calc(90vh - 85px); }
}

This @media query targets high-resolution displays (3x pixel density or higher), but in a cross-browser compatible way:

  • -webkit-min-device-pixel-ratio: 3 – WebKit (Safari, Chrome).
  • -o-min-device-pixel-ratio: 3/1 – Opera (old syntax).
  • min-resolution: 458dpi – very high DPI screens (approx 3× standard 96dpi).
  • min-resolution: 3dppx – modern way to express “3 device pixels per CSS pixel”.

Hybrid Devices: Hover + Coarse Pointer

@media only screen and (hover: hover) and (pointer: coarse) {
  .ftslider { height: calc(85vh - 55px); }
}

It targets devices that support hover and use a coarse pointer (e.g., touch + stylus hybrids).

Why This Matters

  • Better UX: Users on high-DPI devices get clean, non-clipped layouts.
  • Cross-platform support: Android, iOS, tablets, and hybrid devices all behave predictably.
  • Future-proofing: By writing broad yet precise queries, your design adapts to new device types.

Conclusion

Media queries may look intimidating at first glance, but each one has a specific purpose. In this case, they ensure sliders adapt smoothly across iPhones, high-DPI displays, and hybrid touch devices.

When building responsive designs, don’t just think in terms of width and height – consider pixel density, hover ability, and pointer type. That’s the key to delivering a seamless user experience on any screen.

From Static to Dynamic: Creating a Powerful Form Builder with Livewire

Learn how to build a dynamic form builder in Laravel Livewire with repeaters, file uploads, and component-based fields. Step-by-step guide with code examples.

Building dynamic forms is a common requirement in modern applications. Instead of hardcoding fields, you might want users to add components (like text inputs, dropdowns, file uploads, or repeaters) that automatically render inside a master form. With Laravel Livewire, you can develop dynamic form builder in a clean and interactive way without writing tons of JavaScript.

Step 1: Create a Livewire Component

Run the artisan command to create your base form builder component with livewire:

php artisan make:livewire FormBuilder

This creates two files:

  • app/Http/Livewire/FormBuilder.php (backend logic)
  • resources/views/livewire/form-builder.blade.php (frontend view)

Step 2: Define Available Components

Inside app/Http/Livewire/FormBuilder.php, let’s define a list of available components. Each component has a name and a JSON configuration of its fields.

public $availableComponents = [
    [
        'name' => 'Text Input',
        'fields' => [
            ['type' => 'text', 'label' => 'Enter Text', 'value' => '']
        ]
    ],
    [
        'name' => 'Email',
        'fields' => [
            ['type' => 'email', 'label' => 'Enter Email', 'value' => '']
        ]
    ],
    [
        'name' => 'File Upload',
        'fields' => [
            ['type' => 'file', 'label' => 'Upload File', 'value' => '']
        ]
    ],
    [
        'name' => 'Repeater',
        'fields' => [
            ['type' => 'repeater', 'label' => 'Repeater Field', 'items' => []]
        ]
    ],
];

We’ll store user-selected components in:

public $formComponents = [];

Step 3: Add Components to the Form

When a user clicks a component, push it to the form array:

public function addComponent($index)
{
    $component = $this->availableComponents[$index];
    $this->formComponents[] = $component;
}

Step 4: Render Dynamic Fields

Render all selected components to form-builder.blade.php:

<div>
    <!-- Component Menu -->
    <h3>Available Components</h3>
    @foreach ($availableComponents as $i => $comp)
        <button wire:click="addComponent({{ $i }})">
            {{ $comp['name'] }}
        </button>
    @endforeach

    <hr>

    <!-- Dynamic Form -->
    <form wire:submit.prevent="save">
        @foreach ($formComponents as $cIndex => $component)
            <div class="component">
                <h4>{{ $component['name'] }}</h4>

                @foreach ($component['fields'] as $fIndex => $field)
                    @if ($field['type'] === 'text')
                        <input type="text"
                               wire:model="formComponents.{{ $cIndex }}.fields.{{ $fIndex }}.value"
                               placeholder="{{ $field['label'] }}">
                    @elseif ($field['type'] === 'email')
                        <input type="email"
                               wire:model="formComponents.{{ $cIndex }}.fields.{{ $fIndex }}.value"
                               placeholder="{{ $field['label'] }}">
                    @elseif ($field['type'] === 'file')
                        <input type="file"
                               wire:model="formComponents.{{ $cIndex }}.fields.{{ $fIndex }}.value">
                    @elseif ($field['type'] === 'repeater')
                        <button type="button"
                                wire:click="addRepeaterItem({{ $cIndex }}, {{ $fIndex }})">
                            ➕ Add Row
                        </button>

                        @foreach ($field['items'] as $rIndex => $item)
                            <input type="text"
                                   wire:model="formComponents.{{ $cIndex }}.fields.{{ $fIndex }}.items.{{ $rIndex }}.value"
                                   placeholder="Repeater Item {{ $rIndex + 1 }}">
                        @endforeach
                    @endif
                @endforeach
            </div>
        @endforeach

        <button type="submit">Save Form</button>
    </form>
</div>

Step 5: Handle Repeaters in Form

If clicked component is repeater, push it to the form array as follows:

public function addRepeaterItem($cIndex, $fIndex)
{
    $this->formComponents[$cIndex]['fields'][$fIndex]['items'][] = ['value' => ''];
}

Step 6: Save the Form Data

Finally, handle form saving:

public function save()
{
    // Just dump the data for now
    dd($this->formComponents);

    // In real apps, store in DB as JSON
}

Conclusion

Dynamic form builders don’t have to be complicated. With Laravel Livewire, you can build fully interactive forms that support repeaters, file uploads, and dynamic components without writing heavy JavaScript.

This approach keeps your codebase clean, your forms flexible, and your users happy. Once you have the basics working, it’s easy to extend the builder with drag-and-drop sorting, conditional fields, or rich text editors.

Whether you’re building an admin panel, a survey tool, or a custom CMS, this Livewire-powered dynamic form structure gives you a strong foundation to adapt to almost any use case.

Building a Dynamic XML Sitemap in Laravel: A Step-by-Step Guide

Learn how to create a dynamic XML sitemap in Laravel from a list of links. Step-by-step guide with controller, Blade template, and route setup for your web app.

If you’ve ever wondered how search engines like Google actually find and index your Laravel-powered website, the answer often lies in a well-structured XML sitemap. Without one, even your best content might stay hidden in the shadows. The good news? Generating a dynamic XML sitemap in Laravel is easier than you think.

In this guide, I’ll walk you through a step-by-step process to build a dynamic XML sitemap in Laravel from any list of links—helping your site become more SEO-friendly and crawlable in just minutes.

Step 1: Create a Controller

We’ll start by creating a SitemapController to generate the XML response.

<?php

namespace App\Http\Controllers;

use Illuminate\Http\Response;

class SitemapController extends Controller
{
    public function index()
    {
        // Example list of links (this can come from DB or config)
        $links = [
            ['url' => url('/'), 'updated_at' => now()],
            ['url' => url('/about'), 'updated_at' => now()->subDays(2)],
            ['url' => url('/contact'), 'updated_at' => now()->subDays(5)],
        ];

        $content = view('sitemap', compact('links'));

        return response($content, 200)
            ->header('Content-Type', 'application/xml');
    }
}

You can extend this controller to fetche links from your database (e.g., posts, products, categories) automatically instead of a manual list like below:

<?php

namespace App\Http\Controllers;

use App\Models\Page;
use Illuminate\Http\Response;

class SitemapController extends Controller
{
    public function index()
    {
        // Example list of links (this can come from DB or config)
        $links = Page::all();

        $content = view('sitemap', compact('links'));

        return response($content, 200)
            ->header('Content-Type', 'application/xml');
    }
}

Alternative Solution

If you don’t want to create controller, you can add this code directly to routes/web.php route as follows:

<?php

use App\Models\Page;
use Illuminate\Support\Facades\Artisan;
use Illuminate\Support\Facades\Route;

Route::get('/sitemap.xml', function () {
    $links = Page::all();

    $content = view('sitemap', [
        'links' => $links,
    ]);

    return response($content, 200)
            ->header('Content-Type', 'application/xml');
});

Step 2: Create the Blade View

Create a new file at resources/views/sitemap.blade.php and paste the following code:

{!! '<?xml version="1.0" encoding="UTF-8"?>' !!}
<urlset xmlns="http://www.sitemaps.org/schemas/sitemap/0.9">
    @foreach ($links as $link)
        <url>
            <loc>{{ $link->url }}</loc>
            <lastmod>{{ \Carbon\Carbon::parse($link->updated_at)->toAtomString() }}</lastmod>
            <changefreq>weekly</changefreq>
            <priority>0.8</priority>
        </url>
    @endforeach
</urlset>

Note: We use {!! '<?xml version="1.0" encoding="UTF-8"?>' !!} because Blade treats <?xml ... ?> as a PHP tag, which causes a syntax error.


Step 3: Add the Route

Open routes/web.php and add:

use App\Http\Controllers\SitemapController;

Route::get('/sitemap.xml', [SitemapController::class, 'index']);

Note: If you have directly added the code of sitemap to this file, then you can skip this step.


Step 4: Test Your Sitemap

Now, visit:

https://yourapp.com/sitemap.xml

You should see a valid sitemap like this:

<?xml version="1.0" encoding="UTF-8"?>
<urlset xmlns="http://www.sitemaps.org/schemas/sitemap/0.9">
    <url>
        <loc>https://yourapp.com/</loc>
        <lastmod>2025-09-17T09:10:00+00:00</lastmod>
        <changefreq>weekly</changefreq>
        <priority>0.8</priority>
    </url>
    <url>
        <loc>https://yourapp.com/about</loc>
        <lastmod>2025-09-15T09:10:00+00:00</lastmod>
        <changefreq>weekly</changefreq>
        <priority>0.8</priority>
    </url>
</urlset>

Conclusion

With just a few steps, you’ve created a dynamic XML sitemap in Laravel. You can extend this by fetching links from your database (e.g., blog posts, products, categories) instead of a static list.

This setup ensures your site is search engine friendly and keeps your content crawlable and indexable.