Cron jobs are essential tools in Unix/Linux systems for automating repetitive tasks. Whether you’re backing up files, syncing data, or running maintenance scripts, cron jobs make sure your tasks run consistently and on time without manual intervention.
In this article, we’ll walk through how to add jobs to the cron scheduler (crontab) and understand its syntax so you can schedule tasks efficiently.
What is a Cron Job in Unix?
A cron job is a scheduled command or script that runs automatically at specified intervals. The cron daemon (crond) handles these jobs in the background on Unix-like operating systems.
Viewing and Editing Crontabation files
Each user has their own crontab file. To view or edit your crontab:
crontab -eThis command opens your crontab in the default system editor (like vi or nano), allowing you to add or modify jobs.
To view your current scheduled jobs:
crontab -lTo remove all scheduled cron jobs:
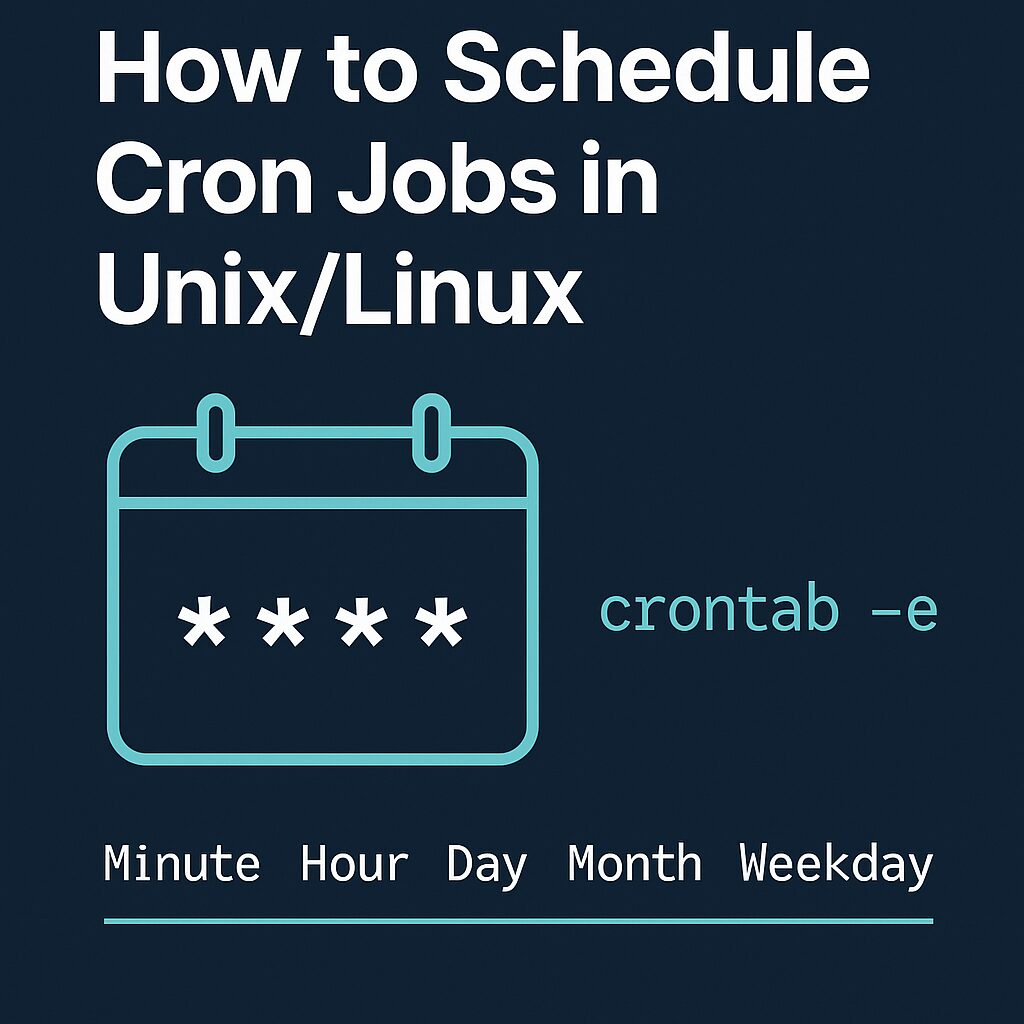
crontab -rUnix Cron jobs Syntax Breakdown
A typical cron job line looks like this:
* * * * * command to be executed
- - - - -
| | | | |
| | | | ----- Day of week (0 - 7) (Sunday=0 or 7)
| | | ------- Month (1 - 12)
| | --------- Day of month (1 - 31)
| ----------- Hour (0 - 23)
------------- Minute (0 - 59)
Each * represents a time or date field. And each field can be configured based on the following table.
| Field | Value Range | Description |
|---|---|---|
| Minute | 0–59 | Minute of the hour |
| Hour | 0–23 | Hour of the day |
| Day | 1–31 | Day of the month |
| Month | 1–12 | Month of the year |
| Weekday | 0–7 (0 or 7 = Sunday) | Day of the week |
Example: Run backup cron job script
If you wished to have a script named /root/backup.sh run every day at 3 am, your crontab entry would look like as follows. First, install your cronjob by running the following command:
# crontab -e
Append the following entry:
0 3 * * * /root/backup.sh
Save and close the file.
More examples
To run /path/to/command five minutes after midnight, every day, enter:
5 0 * * * /path/to/command
Run /path/to/script.sh at 2:15 pm on the first of every month, enter:
15 14 1 * * /path/to/script.sh
To run any PHP script /scripts/phpscript.php at 10 pm on weekdays, enter:
0 22 * * 1-5 /scripts/phpscript.php
Run /root/scripts/perl/perlscript.pl at 23 minutes after midnight, 2am, 4am …, everyday, enter:
23 0-23/2 * * * /root/scripts/perl/perlscript.pl
Run /path/to/unixcommand at 5 after 4 every Sunday, enter:
5 4 * * sun /path/to/unixcommand
You can schedule any command using the cron jobs. For running any script using cron job, make sure your script has executable permissions.
If your script uses environment variables or specific paths, be sure to define them inside the script or call the appropriate environment setup.
Redirecting Output
To log output or errors, you can use the following command and save the logs in file:
0 0 * * * /path/to/script.sh >> /var/log/myscript.log 2>&1>>appends standard output to a log file2>&1redirects errors (stderr) to the same log file without displaying it to the console.
System-Wide Cron Jobs
System-wide cron files can be added to:
- Hourly, daily, weekly, monthly:
/etc/cron.hourly/,/etc/cron.daily/, etc. /etc/crontab/etc/cron.d/
Conclusion
Cron jobs are powerful for scheduling recurring tasks in Unix/Linux environments. By mastering crontab syntax and scheduling structure, you can automate system maintenance, backups, and custom scripts with ease.
Make sure to test your scripts before scheduling them and check logs regularly to confirm successful execution.
See also
See man pages for more information cron(8), crontab(1), crontab(5), run-parts(8)