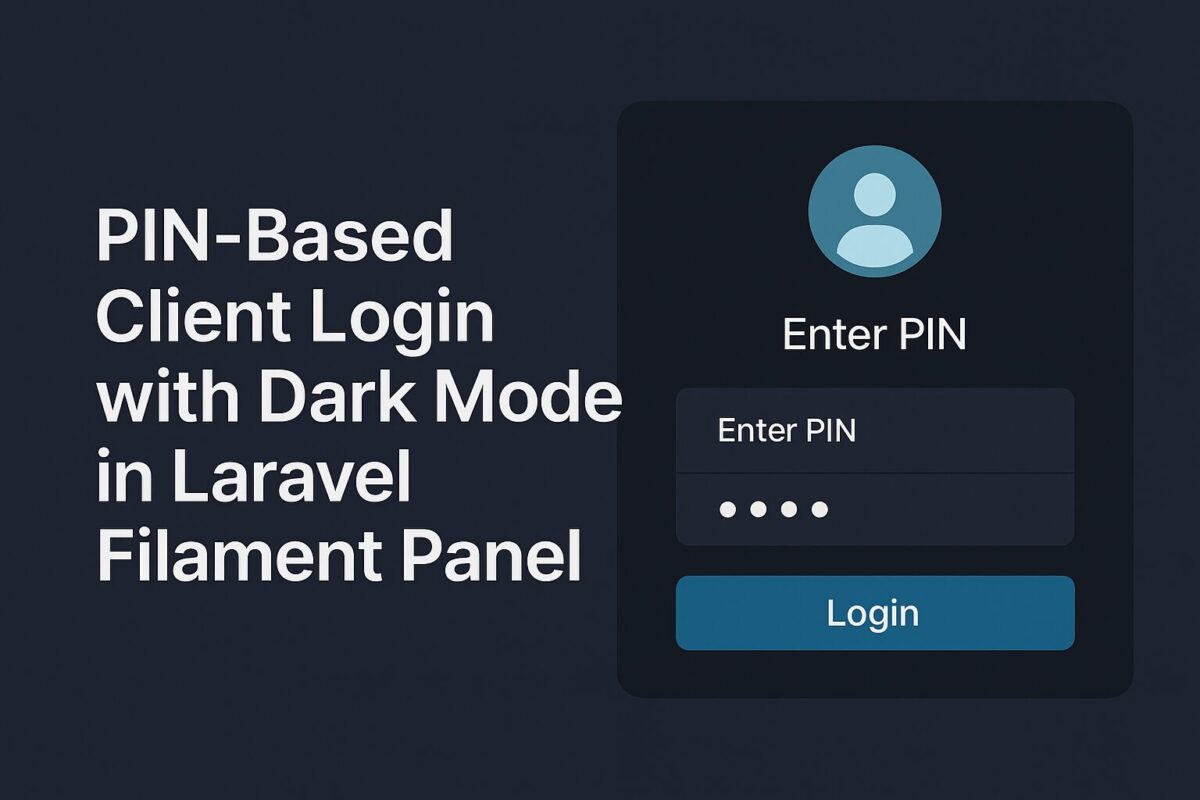
Top 7 Lightweight Linux Distros for Old PCs (2025)

Looking for the best Linux distro for an old PCs? Discover 7 lightweight Linux distributions perfect for reviving aging hardware in 2025.

Lightweight linux distros are popular due to number of benefits it offers. But, which could be the best choice for your old PC and run smoother with your old PC configuration?

In this blog, we’ll discuss various aspects of lightweight distros, some of the top lightwight linux distros and use cases and applications, which can help you to choose best for your old PC.

Why Use a Lightweight Linux Distro?

Lightweight linux distros offers flexibility, efficiency and versatility with minimum resources. Here are few points to consider,

Performance benefits for old hardware

These distributions are often used for reviving older hardware or make your older PC live again because it provides very good performance even on older hardwares.

Power efficiency and minimal resource usage

These distributions require very less resources like they can run on 512MB of RAM on Pentium II processor. Their power consumption is also very low compared to modern distros.

In this blog, we will discuss top 7 lightweight distros for old PCs in 2025. Here is the overview of these distros.

Puppy Linux

Puppy Linux is a unique family of Linux distributions specifically meant for the personal computers created by Barry Kauler in 2003.

It has some unique advantages as follows,

  1. Ready to use: all commonly used tools are already included. So, you can start right after installing it.
  2. Ease of use: lots of helps & hints are included to make it easy to use for even a beginner.
  3. Relatively small size: It will take typically 500 MB or less.
  4. Fast and versatile.
  5. Customisable within minutes: You can make all your customizations and save them as remasters. So, whenever you want to reset your PC, you can use that remaster with all your configurations intact.
  6. Different flavours: It is optimised to support both older & newer computers.
  7. Variety: It has hundreds of derivatives called them as “puplets”, one of which will surely meet your needs.

You can download and try the Puppy Linux from https://puppylinux-woof-ce.github.io/index.html

What to upgrade your Old PC? Install SSD for the better performance: https://amzn.to/45eWAl8

Lubuntu

Lubuntu is a fast and lightweight operating system built on Linux system with a clean and easy-to-use UI/UX. It required very low hardware resources, because it uses the minimal desktop LXDE/LXQT, and a selection of light applications. Lubuntu was founded by Mario Behling and has been grown for many years by Julien Lavergne.

You can use Lubuntu operating system for the your latest systems as well as for lower resource computers and older systems.

You can download Lubuntu from https://lubuntu.net/

Linux Lite

Linux Lite is free operating system for everyone. It is easy to use, and suitable for beginner users Linux as it offers a lot of beginner friendly documentation. Due to it’s low requirement of resources, it is also famous amongs the people who want a lightweight environment that is also fully functional. This distribution is easy to set up and use. It provides a great balance of speed, user friendliness, features and stability. Linux Lite was created to make the transition from Windows to a linux based operating system, as smooth as possible.

To install Linux Lite operating system, download the copy from https://www.linuxliteos.com/download.php

antiX

antiX is a fast, lightweight and easy to install systemd-free linux distribution. It is based on Debian Stable for Intel-AMD x86 compatible systems. antiX offers users an environment suitable for old as well as new computers. So don’t throw away that old computer yet!

The goal of antiX is to provide a lightweight, but fully functional and flexible free operating system, which can be useful for both beginners and experienced users of Linux. It can run on any old PC with as low as 256MB RAM with pre-configured swap. 512MB RAM is the recommended minimum requirement for antiX and installation to hard drive requires a minimum 7.0GB hard disk space.

antiX is available in 64 bit (computers built in the last 10 years) or 32 bit (very old computers or newer machines but be aware that a lot of software no longer provides 32 bit versions).

Download the different flavours of antiX from https://antixlinux.com/download/

Bodhi Linux

Bodhi Linux 7.0.0 is the lightweight Linux Distribution built on top of Ubuntu LTS (22.04) featuring the Moksha Desktop. It is known for minimalism, resource efficiency, and user choice. The team behind Bodhi Linux works to make the distribution as lean as possible and believes that the end-user should be able to choose the applications that they want rather than have a bunch of pre-installed applications that are unnecessary or unwanted.

The minimum system requirements are as follows,

  • 32bit, 500MHz Processor (including Non-PAE)
  • 512MB of RAM
  • 5GB of drive space

And recommended system requirements are as follows,

  • 64bit, 1.0GHz processor
  • 768MB of RAM
  • 10GB of drive space

Download the Bodhi Linux with Moksha Desktop from https://www.bodhilinux.com/download/

Budget DELL laptop under 30k. https://amzn.to/4k5yFJN

MX Linux

MX Linux has different flavours for different type of requirements.

  • MX Linux – KDE, which provides wide range of advanced applications and require high resources. It can run on newer 64-bit computers.
  • MX Linux – XFCE, which requires mid-weight resource, but it can run on older PCs as well as newer 64-bit computers.
  • MX Linux – Fluxbox, which reauires light weight resources and can run on any older PC as well as newer computers.

The MX Linux – Fluxbox can provide high speed performance using low resources. It is lightweight and fully functional system that has many unique features:

  • Extended hardware support by virtue of low graphical requirements.
  • Restricted base default package set gives the user easy control over components.
  • Many unique apps ease and enliven user experience.
  • Native dock and icon management tools join the tint2 panel for desktop customization.

Download various MX Linux flavours from https://mxlinux.org/download-links/

Tiny Core Linux

Tiny Core is designed to run from a RAM copy created at boot time. Besides being fast, this protects system files from changes and ensures a pristine system on every reboot.

Very Small. It required 10MB of RAM, which is 1/400 to 1/100 the size. So, It is flexible enough to be stored and run from usb sticks, a full CD, or even embedded devices.

Linux. Tiny Core uses the Linux Kernel and a set of command-line (text interface) tools including busybox.

A GUI Desktop. Tiny Core has a flexible and fully-customizable Graphical User Interface Desktop. You can also quickly install and try out a variety of other desktops and interfaces.

Unusually Stable. Tiny Core uses program ‘extensions’ to avoid damage to the system files. These extensions are re-prepared at each reboot … and they are prepared fast.

Unusually Fast. Unlike most operating systems, the Tiny Core can run completely from RAM. Tiny Core can run in 48 megabytes of RAM … or less.

Internet ready. Tiny Core almost always finds your network card right away. You’ll be adding applications and tools after an unusually quick boot.

Available even smaller. Linophiles that get things done without a GUI can get the MicroCore, a version of Tiny Core without X that is under 7 MB.

An open source community. Tiny Core is under active community development, led by a team of really dedicated people.

Download the most lightweight and fast Linux Distro from http://www.tinycorelinux.net/downloads.html

Final Thoughts + My Recommendation

We have discussed top 7 lightweight linux distros, you can use for your older PC to make them alive again. All of them are unique with their different set of advantages and it is difficult to choose anyone randomly. So, my suggestion is to check all the linux distros and their recommonded requirements to run. Compare these requirements with your computer requirement and choose accordingly. I installed Bodhi Linux for my 10 years old laptop and it is running very smoothly.

Frequently Asked Questions (FAQ)

What is the lightest Linux distro for old PCs?

Tiny Core Linux is one of the lightest Linux distros, with an ISO under 20MB and minimal system requirements.

Can I use Linux on a PC with 1GB RAM?

Yes, distros like Puppy Linux, antiX, and Lubuntu are designed to run smoothly on systems with as little as 512MB–1GB of RAM.

Is Linux better than Windows for old PCs?

Yes, Linux is often more efficient and secure for older hardware compared to Windows, especially when using lightweight distros.

Disclaimer: This post contains affiliate links. If you use these links to buy something, I may earn a commission at no extra cost to you.

Install the Laravel Filament Panel Builder

Learn to install and set up Laravel Filament, a tool for creating customizable admin panels and CRUD applications. This guide covers requirements, installation steps, and user creation. Follow this concise tutorial to get started with Filament in your Laravel project quickly and efficiently.

Laravel Filament is a powerful tool designed to create Admin panels and manage content in Laravel applications. It provides a highly customizable and developer-friendly interface for creating CRUD applications, dashboards, and various business-related applications. Filament is known for its flexibility and ease of use, allowing developers to scaffold forms, tables and pages quickly without writing a lot of boilerplate code.

This article describes the installation process filament panel over laravel with most of the possible configations and steps.

Requirements

Install and configure the following components, before running any filament command.

  • PHP v8.1+
  • Laravel v10.0+
  • Livewire v3.0+ (Filament composer command will install this package automatically. So, no need to install this package separately.)

Install Laravel Filament Panel

To install the filament panel over laravel, run the following command at the root of the project folder,

composer require filament/filament:"^3.2" -W

This command will install the base package of filament. This will also install livewire package, which is in the requirements.

php artisan filament:install --panels

This command will install the filament panel after some information required to install the panels. It will ask the following questions,

What is the ID?

On the basis of this ID, it will create the panel provide for the filament panel and also register this panel provider.

For Example:
If ID is admin, it will create the panel provide to he following location, app/Providers/Filament/AdminPanelProvider.php

If you encounter an error when accessing your panel, ensure that the service provider is registered in bootstrap/providers.php (for Laravel 11 and above) or config/app.php (for Laravel 10 and below). If it isn’t, you’ll need to add it manually.

Create a User

Next step is creating a user to access this panel. But, before running the create user command, check the following laravel configuration and update the configuration as per the requirements,

  • Add Database credentials to .env file.
  • Run the following command to run the migration. It will create users table into the database.
    php artisan migrate

Run the following command to create a user after checking above requirements,

php artisan make:filament-user

It will ask some basic questions like name, email, password, etc. for creating a user.

After creating a user, run php artisan serve, open http://127.0.0.1:8000/admin in your web browser, sign in using the created user credentials, and start building your app!

Laravel Queues: An Asynchronous Processing

This article aims to guide you through the process of executing jobs asynchronously using queues and workers in Laravel.

When it comes to web applications and softwares, speed is crucial for a satisfactory user experience. However, certain tasks require more time to complete, such as sending automated emails, importing large data from CSV or excel files or generating complex reports from extensive data sets. These kinds of tasks cannot be performed synchronously. The well-designed web applications utilize such asynchronous processing in the background, which can be performed using a capability provided by Laravel Queues.

Prerequisites:

This article aims to guide you through the process of executing jobs asynchronously using queues and workers in Laravel. Prior to diving in, please ensure that you have PHP, Composer and MySQL installed on your system, and that you are familiar with bootstrapping and initiating a new Laravel project.

The Concept:

Before delving into the code, I would like to describe the concept of asynchronous processing with a real-life analogy. Imagine yourself as the owner of a local grocery shop that accepts orders over the phone and delivers the requested items to customers’ doorsteps.

Now, assume that you receive a phone call from a customer and take a new order. You write this order on the piece of paper. You then proceed to the storeroom, locate the individual products, pack them into a box, and arrange for delivery. In this scenario, you cannot accept any new orders until you have dispatched the current one. This is called synchronous approach. It blocks your ability to handle other tasks until you complete the currently running process at hand.

However, instead of sticking to a synchronous model, you have the option to hire an additional worker for the storeroom. By doing so, you can accept a new order, jot it down on a piece of paper (referred to as a job), and place it in a queue. One of the storeroom workers will pick a job from the queue, assemble the order, and arrange for delivery. Afterwards, the worker will return to the queue, select the next job, and commence its processing. This is called an asynchronous approach. It  allows for a more efficient workflow. While employing extra workers may require additional resources, it enables you to handle more orders without impeding your overall productivity. This, in turn, leads to improved performance and heightened customer satisfaction.

The Basic Implementation:

Now, let’s see how to implement this asynchronous approach of a job, a worker, and a queue in Laravel. To start, create a new Laravel project somewhere on your computer. Open the project in your favourite IDE and update the code for the routes/web.php file as follows:

Route::get('/', function () {

    dispatch(function() {
        sleep(5);
        logger('job done!');
    });

    return view('welcome');
});

The dispatch() helper function in Laravel sends a new job to a queue. Here, a job is regular PHP code in the form of a closure or class. You can also use job classes instead of closures in above code.

To simulate a long-running task, I have added an explicit delay of five seconds using the sleep function in the job closure. Then, I used the logger() helper function to print the line “job done!” in the project’s laravel.log file located at storage/logs/laravel.log.

Now, start the project by running the following command:

php artisan serve

And open http://127.0.0.1:8000 in your browser. You will see the browser loading for five seconds, and then the welcome page will show up. If you check the log file at location storage/logs/laravel.log, you will see the following log entry:

[2021-08-23 14:37:50] local.DEBUG: job done!

This means that the job ran successfully after the five-second delay, but still it is not running asynchronously. It is still blocking the I/O operations as the browser was in a loading state for five seconds. It is because of the QUEUE_CONNECTION variable in the project’s .env file. This variable indicates the connection to be used in the queue service in Laravel. By default, it has been set to sync, which means that Laravel will process all the jobs synchronously.

Asynchronous Approach:

For asynchronous job-processing, you will have to use a different connection. Laravel has provided a pre-configured list of connections inside the config/queue.php file as follows:

'connections' => [

    'sync' => [
        'driver' => 'sync',
    ],

    'database' => [
        'driver' => 'database',
        'table' => 'jobs',
        'queue' => 'default',
        'retry_after' => 90,
        'after_commit' => false,
    ],

    'beanstalkd' => [
        'driver' => 'beanstalkd',
        'host' => 'localhost',
        'queue' => 'default',
        'retry_after' => 90,
        'block_for' => 0,
        'after_commit' => false,
    ],

    'sqs' => [
        'driver' => 'sqs',
        'key' => env('AWS_ACCESS_KEY_ID'),
        'secret' => env('AWS_SECRET_ACCESS_KEY'),
        'prefix' => env('SQS_PREFIX', 'https://sqs.us-east-1.amazonaws.com/your-account-id'),
        'queue' => env('SQS_QUEUE', 'default'),
        'suffix' => env('SQS_SUFFIX'),
        'region' => env('AWS_DEFAULT_REGION', 'us-east-1'),
        'after_commit' => false,
    ],

    'redis' => [
        'driver' => 'redis',
        'connection' => 'default',
        'queue' => env('REDIS_QUEUE', 'default'),
        'retry_after' => 90,
        'block_for' => null,
        'after_commit' => false,
    ],
],

You can use any connection except sync,which is used for synchronous job-processing. For this example, we will use the database connection. To update the connection, open the project’s .env file and change the value of QUEUE_CONNECTION to database and save the file.

But, to work with database connection, we have to create a table to maintain our asynchronous jobs. To create the migration for this table, run the following command:

php artisan queue:table

It will generate the migration script for creating the jobs table. Open the newly generated migration script, it will have the following content:

<?php

use Illuminate\Database\Migrations\Migration;
use Illuminate\Database\Schema\Blueprint;
use Illuminate\Support\Facades\Schema;

return new class extends Migration
{
    /**
     * Run the migrations.
     */
    public function up(): void
    {
        Schema::create('jobs', function (Blueprint $table) {
            $table->bigIncrements('id');
            $table->string('queue')->index();
            $table->longText('payload');
            $table->unsignedTinyInteger('attempts');
            $table->unsignedInteger('reserved_at')->nullable();
            $table->unsignedInteger('available_at');
            $table->unsignedInteger('created_at');
        });
    }

    /**
     * Reverse the migrations.
     */
    public function down(): void
    {
        Schema::dropIfExists('jobs');
    }
};

Now, run the migration command as follows to create the jobs table in the database:

php artisan migrate

This table will hold all the queued jobs until a worker processes them. Before starting the laravel, clear the project’s log file located at storage/logs/laravel.log and run the following command:

php artisan serve

And open http://127.0.0.1:8000 in your browser. This time, the page will render almost immediately. After waiting for five seconds, if you check the storage/logs/laravel.log file, you’ll find it empty. Because, the above setup will only add the job into the jobs table. But, execution of this job is still pending.

If you look at the jobs table in your database, you’ll see that the framework has pushed a new job to the queue. To execute this job, we have to run the Laravel queue worker process.

Laravel Queue Worker:

A queue worker is a regular process that runs in the background and polls the queue for unprocessed jobs. To start a new worker, execute the following command inside your project directory:

php artisan queue:work

The worker will start and begin processing the unprocessed job immediately. Now, check the storage/logs/laravel.log file. It will display the following logs: 

[2021-08-23 15:30:34][1] Processing: Closure (web.php:18)
[2021-08-23 15:30:39][1] Processed:  Closure (web.php:18)

Note: To process jobs automatically in the future, you’ll have to keep the worker process running.

And that concludes this article. I have covered the basic concepts of how synchronous and asynchronous approach are working and how you can use Laravel Queues to run asynchronous jobs. There are numerous other aspects of queue management that you should familiarize yourself with, such as job uniqueness, handling race conditions, and implementing throttling. It is advisable to begin incorporating queues into your applications and learn through hands-on experience. Additionally, make sure to thoroughly explore the official documentation on Laravel Queues. If you have any questions or concerns about any of the concepts presented in this article, please feel free to reach out to me on LinkedIn, or GitHub. Until the next article, stay safe and continue your learning journey.

Laravel order by relation column with example

Explore examples demonstrating the use of Laravel’s orderBy method with relationship columns across various versions.

In this post, we focus on examples to use Laravel order by relation column. There are many different ways to achieve it.

Below are some examples that demonstrate the usage of Laravel‘s orderBy method with relationship columns. These examples can be applied in Laravel versions 5, 6, 7, 8, 9, and 10.

Example 1: Ordering by a BelongsTo Relationship Column

Consider the scenario where you have a "User" model that belongs to a "Role" model. You can use the orderBy method to sort the users based on the role name in ascending order.

$users = User::with(['role' => function ($q) {
    $q->orderBy('name');
}])->get();

You can use the same code for descending order by adding 'desc' argument to orderBy method as follows,

$users = User::with(['role' => function ($q) {
    $q->orderBy('name', 'desc');
}])->get();

For above example to work properly, you have to define belongsTo relationship of "Role" model inside the "User" model as follows,

public function role(): BelongsTo
{
    return $this->belongsTo(Role::class, 'role_id', 'id');
}

Example 2: Using inner join with relation table

For above scenario, where “User” model that belongs to “Role” model, you can use join method to perform user sorting based on role name as follows,

$users = User::select('*')
                 ->join('roles', 'users.role_id', '=', 'roles.id')
                 ->orderBy('roles.name', 'asc');

As above example, you need to replace the second argument of orderBy method to 'desc' for sort records in descending order. There is no need of any relationship required for this query.

Example 3: Using sortBy() and sortByDesc() methods

You can use sortBy() and sortByDesc() methods to order the records for the same scenario as follows,

$users = User::get()->sortBy(function($query){
    return $query->role->name;
})->all();

In above example, it first get the users collection from the database and then sort them by the provided relation column. For these methods, you have to define belongsTo relationship in "User" model.

You can use sortByDesc() method same as above.

Example 4: Using subquery and whereColumn method

You can also use subqueries to sort records. For the above scenario, you can use subqueries as follows,

$users = User::select('*')
    ->orderBy(Role::select('name')
        ->whereColumn('roles.id', 'users.role_id')
    );

In above example, we have we used subquery from roles table using whereColumn method to get the name of the role of each row of users table. After getting the role name, we used orderBy method to achieve the sorted records.

For sorting records in descending order, you can use the above example with orderByDesc method.

You can use this example, without defining belongsTo relationship in model.

These are some useful examples to order records based on relationship model in Laravel.

Git Commands to Remove Merged or Nonexistent Local Branches

Discover git commands to delete local branches that have been removed from remote or merged into the main branch.

Over time, your local git branches list can become overwhelming, particularly if you develop on a single branch, generate a pull request, merge it into the main branch, and then remove the remote git branch once it has been merged. After the branch is removed from the remote repository, there is no need to keep it on your local machine.

The following git command will delete all local branches that have been merged into the main branch. If your git trunk branch is not named main or you wish to remove all branches that have been merged into a branch other than main, simply modify the two instances of the word main in the command to reflect the name of your branch.

List of git commands to remove local merged git branches

To remove all the local branches, which are merged into the main branch, navigate to the root of the repository and run the following git commands,

  • Fetch the latest updates from the git repository
git fetch
  • See the list of local branches available in the repository
git branch
  • Delete all local branches that have been merged to main branch
git branch --merged main | grep -v "^\* main" | xargs -n 1 -r git branch -d

Explanation:

This command is a combination of several Git commands and shell commands that work together to delete all the local Git branches that have been merged into the main branch, except for the main branch itself.

Here’s a breakdown of the individual commands and what they do:

  1. git branch --merged main: This command lists all the local branches that have been merged into the main branch. The --merged option tells Git to only list branches that have been fully merged into main.
  2. grep -v "^\* main": This command filters out the main branch from the list of branches. The -v option tells grep to invert the match, i.e., show only the lines that do not match the pattern. The pattern in this case is "^\* main", which matches lines that start with an asterisk (\*) followed by the text main.
  3. xargs -n 1 -r git branch -d: This command passes the list of merged branches (excluding main) to the git branch -d command, which deletes each branch. The -n 1 option tells xargs to pass one branch name at a time to the git branch -d command. The -r option tells xargs to only run the git branch -d command if there is at least one branch name to pass to it. The -d option tells Git to delete the branches, but only if they have been fully merged into the current branch (in this case, main). Note that this option will fail if the branch has unmerged changes, in which case the -D option could be used instead to force-delete the branch.

Want to learn such useful commands? Get a Mastering Git book from https://amzn.to/3Hp527B

List of git commands to remove local nonexistent git branches

Similarly, run the following git commands to remove all the deleted branches from the local computer:

  • Fetch the latest updates from the git repository
git fetch
  • See the list of local branches available in the repository
git branch
  • Delete all local branches that have been merged to main branch
git branch -vv | grep ': gone]' | grep -v '\*' | awk '{ print $1; }' | xargs -r git branch -d

Explanation:

This command is a combination of several commands in a shell pipeline that work together to delete Git branches that are marked as "gone".

Here’s a breakdown of the individual commands and what they do:

  1. git branch -vv: This command lists all the Git branches in the local repository, with additional information about their upstream branches (if any). The -vv option adds more information about whether each branch is “up to date”, “behind”, or “ahead” of its upstream branch.
  2. grep ': gone]': This command filters the output of the git branch -vv command to only show the branches that are marked as "gone". The grep command searches for lines that contain the text ": gone]", which indicates that a branch is gone.
  3. grep -v '\*': This command further filters the output to exclude any branches that are currently checked out (indicated by the asterisk symbol). The -v option tells grep to invert the match, i.e., show only the lines that do not contain an asterisk.
  4. awk '{ print $1; }': This command extracts only the branch names from the filtered output. The awk command splits each line of input into fields and prints only the first field, which is the branch name.
  5. xargs -r git branch -d: This command passes the branch names to the git branch -d command, which deletes each branch. The -r option tells xargs to only run the git branch -d command if there is at least one branch name to pass to it. The -d option tells Git to delete the branches. Note that this option will fail if the branch has unmerged changes, in which case the -D option could be used instead to force-delete the branch.

Note: you can test these git commands by creating temporary repository on any git platform like, GitHub, GitLab or Bitbucket.

Disclaimer: This post contains affiliate links. If you use these links to buy something, I may earn a commission at no extra cost to you.