Git Commands: How to Remove Local Git Branches that are Merged or Nonexistent

Over time, your local git branches list can become overwhelming, particularly if you develop on a single branch, generate a pull request, merge it into the main branch, and then remove the remote git branch once it has been merged. After the branch is removed from the remote repository, there is no need to keep it on your local machine.

The following command will delete all local branches that have been merged into the main branch. If your git trunk branch is not named main or you wish to remove all branches that have been merged into a branch other than main, simply modify the two instances of the word main in the command to reflect the name of your branch.

Remove local merged git branches

To remove all the local branches, which are merged into the main branch, navigate to the root of the repository and run the following git commands,

  • Fetch the latest updates from the git repository
git fetch
  • See the list of local branches available in the repository
git branch
  • Delete all local branches that have been merged to main branch
git branch --merged main | grep -v "^\* main" | xargs -n 1 -r git branch -d

The above steps will remove all the branches from the local computer, which are already merged in main branch.

Remove local noexistent git branches

Similarly, to remove all the branches from the local computer, which are deleted or not exists on the remote repository, navigate to the root of the repository and run the following git commands,

  • Fetch the latest updates from the git repository
git fetch
  • See the list of local branches available in the repository
git branch
  • Delete all local branches that have been merged to main branch
git branch -vv | grep ': gone]' | grep -v '\*' | awk '{ print $1; }' | xargs -r git branch -D

How to upload file code using Laravel

To upload a file using Laravel, you can follow these steps:

Create a new form in your Laravel view with an input field for the file:

<form method="POST" action="{{ route('file.upload') }}" enctype="multipart/form-data">
    @csrf

    <input type="file" name="file">

    <button type="submit">Upload</button>
</form>

Define a new route in your routes/web.php file that points to a controller method that will handle the file upload:

Route::post('/file/upload', [App\Http\Controllers\FileController::class, 'upload'])->name('file.upload');

Create a new controller method in FileController that will handle the file upload:

public function upload(Request $request)
{
    // Validate the uploaded file
    $request->validate([
        'file' => 'required|file|max:1024', // limit file size to 1 MB
    ]);

    // Store the uploaded file in the storage/app/public directory
    $path = $request->file('file')->store('public');

    // Generate a URL for the uploaded file
    $url = Storage::url($path);

    // Redirect back with a success message
    return back()->with('success', 'File uploaded successfully: ' . $url);
}

In the upload() method, we first validate that the uploaded file meets our requirements (in this case, it must be a file and not exceed 1 MB in size). We then use the store() method on the uploaded file to store it in the storage/app/public directory. This directory is publicly accessible, so we can generate a URL for the file using the url() method on the Storage facade. Finally, we redirect back to the form with a success message that includes the URL of the uploaded file.

You can now test the file upload functionality by navigating to the form and selecting a file to upload. If the file meets the validation requirements, it will be uploaded and a success message will be displayed. You can then access the uploaded file at the generated URL.

What is Middleware and how to create one in Laravel?

It’s best to envision middleware as a series of “layers” for HTTP requests that must pass through before they hit your application. Each layer can examine the request and even reject it entirely.

Middleware provides a convenient mechanism for inspecting and filtering HTTP requests entering your application. It’s best to envision middleware as a series of “layers” for HTTP requests that must pass through before they hit your application. Each layer can examine the request and even reject it entirely.

For example, Laravel includes a middleware that verifies the authenticity of the user of your application. If the user is not authenticated, the middleware will redirect the user to your application’s login screen. However, if the user is authenticated, the middleware will allow the request to proceed further into the application.

To perform different tasks, we can develop many middlewares besides authentication. For example, a logging middleware might log all incoming requests to your application. 

Laravel framework has included many middlewares, including middleware for authentication and CSRF protection. All of these middlewares are located in the app/Http/Middleware directory.

To create a middleware, we can use the following command,

php artisan make:middleware <middleware-name>

For example, if we want to create a middleware for checking transactions, we can run the following command,

php artisan make:middleware CheckTransaction

 After successful execution of the command, a middleware class will be created under the app/Http/Middleware directory.

In this class, we can define methods to check transactions. If the transaction is not completed, we can redirect the user back to the failed transaction page. However, on the successful transactions, we can allow users to proceed to the next page.

<?php
 
namespace App\Http\Middleware;
 
use Closure;
 
class CheckTransaction
{
    /**
     * Handle an incoming request.
     *
     * @param  \Illuminate\Http\Request  $request
     * @param  \Closure  $next
     * @return mixed
     */
    public function handle($request, Closure $next)
    {
        if ($request->input('status') !== 'completed') {
            return redirect('transaction-failed');
        }
 
        return $next($request);
    }
}

As you can see, if the transaction status does not set to “completed”, the middleware will return an HTTP redirect to the client; otherwise, the request will be passed further into the application.

To pass the request deeper into the application (allowing the middleware to “pass”), you should call the $next callback with the $request.

Update a bunch of images at once and export them as separate images using GIMP

Scaling of images can be achieved without using any scripts/extensions, but to export all images as separate image files, we need to install a plugin in GIMP named ‘Export Layers’.

You can download this plugin from the following link,

https://khalim19.github.io/gimp-plugin-export-layers/

This plugin is available for Windows, Linux, and macOS. For Windows, it can be installed using an executable file.

After installation of this plugin, restart GIMP.

Now, that we have the plugin installed, there is a very simple way to accomplish this task using the following easy steps.

  1. File > Open as layers to select all images to perform a specific task (This is one single action since the file selector allows the selection of multiple images)
  2. Image > Scale image to 75×75 to scale all layers together (We can perform many different actions similar to scaling like transforming, resizing, cropping, etc.)
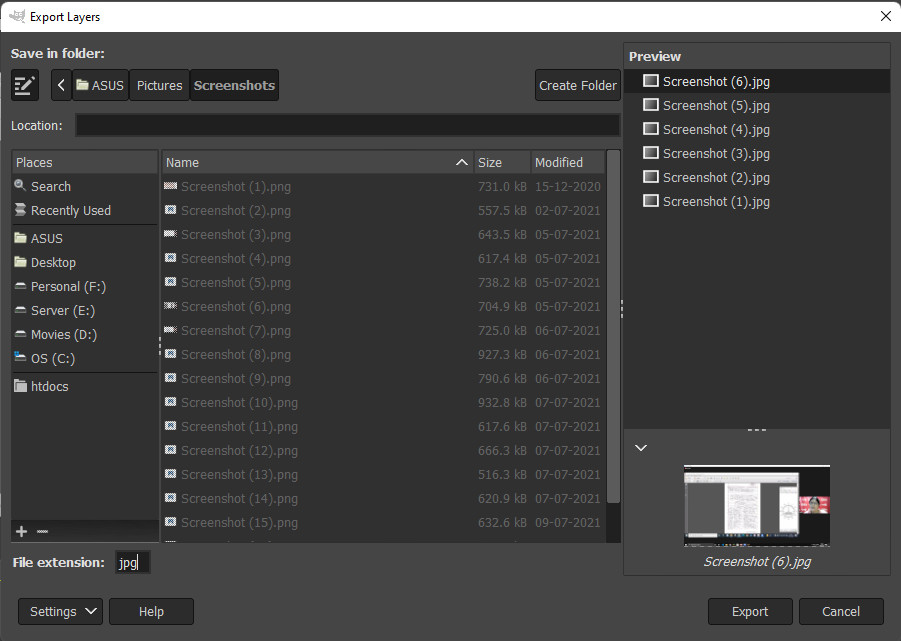
  3. File > Export Layers will open a dialog that appears allows you to choose the output folder and file extension.
Export Layers Dialog Box

The above steps will save all your image layers to separate files. This could reduce so many steps of similar tasks.

You can perform many different actions like transforming, cropping, resizing, etc. using same steps.

Different YouTube video thumbnail URLs

To get the different thumbnails of embedded video from YouTube, use these image URLs for different dimensions,

1) For medium sized thumbnail image
http://i.ytimg.com/vi/<YouTube Video ID>/0.jpg

2)  For small sized thumbnail image

http://i.ytimg.com/vi/<YouTube Video ID>/1.jpg
http://i.ytimg.com/vi/<YouTube Video ID>/2.jpg
http://i.ytimg.com/vi/<YouTube Video ID>/3.jpg

3) For large or maximum sized thumbnail image

http://i.ytimg.com/vi/<YouTube Video ID>/maxresdefault.jpg

4) For High Definition Image

http://img.youtube.com/vi/<YouTube Video ID>/hqdefault.jpg

In above URLs, provide <YouTube Video ID>. To get Video ID from YouTube URL,

  • Go to http://www.youtube.com
  • Play any video
  • Copy an alphanumeric string followed by v= from URL

This is a Video ID of currently playing video.

For example:

Video ID of YouTube Video https://www.youtube.com/watch?v=ny8ngucMd_U is ny8ngucMd_U

Use this video ID in above thumbnail URLs to get different thumbnail image of this video.