Have you ever wanted to give your Laravel app a professional, desktop-like file explorer – with folders, nested subfolders and document search?
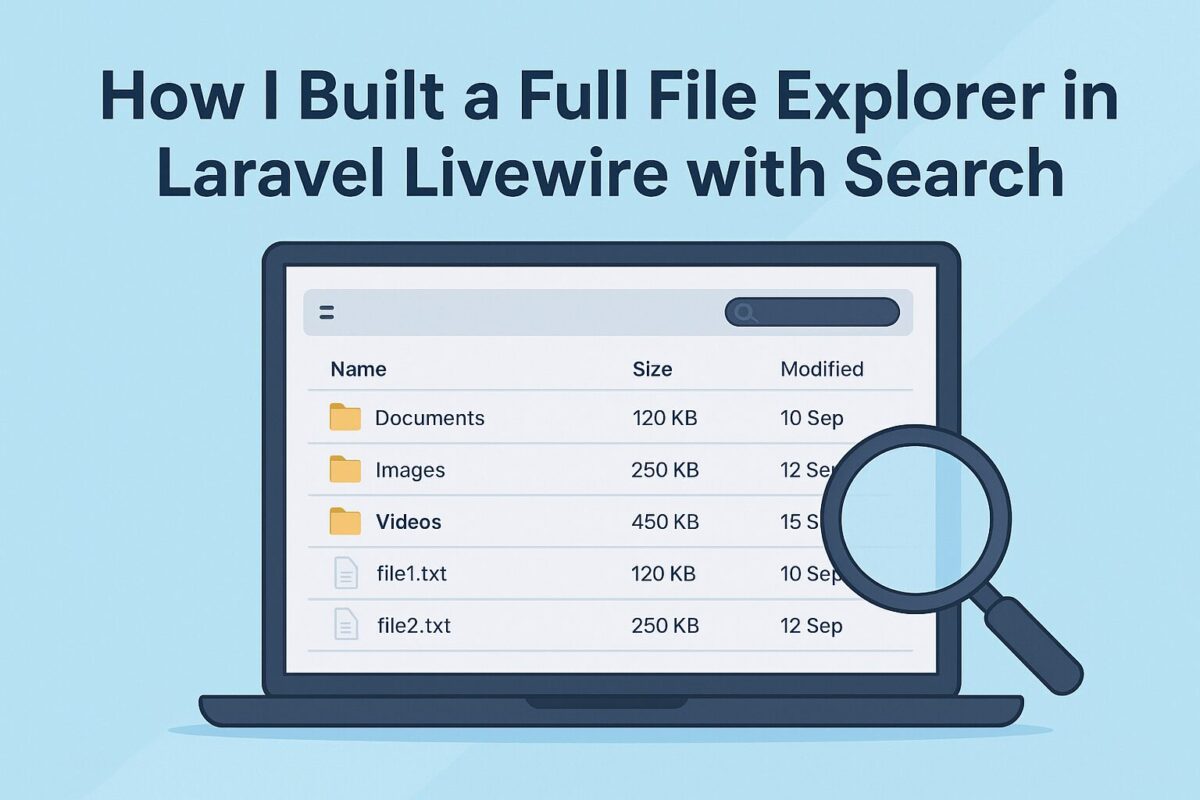
In this tutorial, I’ll walk you through building full file explorer using Laravel Livewire and Bootstrap 5. We’ll create a clean two-pane layout: the left sidebar displays your folder structure (applications and subfolders), while the right pane dynamically lists documents with instant search and filtering.
By the end, you’ll have a fully functional, real-time file manager where users can browse folders, search documents by name and group them by type – all powered by Livewire’s reactivity and Laravel’s filesystem magic.
What We’re Building
We’ll create a two-pane interface like a typical file explorer:
- Left sidebar → list of applications/folders and nested subfolders.
- Right pane → list of documents for the selected application.
- Features:
- Real-time search
- Subfolder navigation
- Document type–based organization
Step 1. Setting Up the Database
We’ll use two tables: applications and documents. applications table holds our folders and subfolders, while documents table holds all documents with name and path with application relation.
Schema::create('applications', function (Blueprint $table) {
    $table->id();
    $table->string('name');
    $table->foreignId('parent_id')->nullable()->constrained('applications')->cascadeOnDelete();
    $table->timestamps();
});

Schema::create('documents', function (Blueprint $table) {
    $table->id();
    $table->foreignId('application_id')->constrained()->cascadeOnDelete();
    $table->string('title');
    $table->string('file_path');  // e.g. "documents/report.pdf"
    $table->string('type')->nullable(); // e.g. "invoice", "report", "letter"
    $table->timestamps();
});
Step 2. Eloquent Relationships
Define relationships in models as follows,
// Application.php
class Application extends Model
{
    protected $fillable = ['name', 'parent_id'];

    public function parent()
    {
        return $this->belongsTo(Application::class, 'parent_id');
    }

    public function children()
    {
        return $this->hasMany(Application::class, 'parent_id');
    }

    public function documents()
    {
        return $this->hasMany(Document::class);
    }
}

// Document.php
class Document extends Model
{
    protected $fillable = ['application_id', 'title', 'file_path', 'type'];

    public function application()
    {
        return $this->belongsTo(Application::class);
    }
}
Step 3. The Livewire Component
Run the following command to create the livewire component:
php artisan make:livewire ApplicationExplorerIt will create 2 files as follows,
app/Http/Livewire/ApplicationExplorer.phpfor file explorer processing.resources/views/livewire/application-explorer.blade.phpfor file explorer view.
Define all Processes
Open app/Http/Livewire/ApplicationExplorer.php and add the following code:
namespace App\Http\Livewire;

use Livewire\Component;
use App\Models\Application;
use App\Models\Document;
use Livewire\WithPagination;
use Illuminate\Support\Facades\Storage;
use ZipArchive;

class ApplicationExplorer extends Component
{
    use WithPagination;
    protected $paginationTheme = 'bootstrap';

    public $selectedAppId = null;
    public $search = '';
    public $filterType = '';

    public function updatingSearch()
    {
        $this->resetPage();
    }

    public function selectApp($appId)
    {
        $this->selectedAppId = $appId;
        $this->reset(['search', 'filterType']);
        $this->resetPage();
    }

    public function render()
    {
        $applications = Application::with('children')->whereNull('parent_id')->get();

        $selectedApp = $this->selectedAppId ? Application::find($this->selectedAppId) : null;

        $documents = collect();
        if ($selectedApp) {
            $documents = Document::where('application_id', $this->selectedAppId)
                ->when($this->filterType, fn($q) => $q->where('type', $this->filterType))
                ->when($this->search, fn($q) => $q->where('title', 'like', "%{$this->search}%"))
                ->paginate(10);
        }

        return view('livewire.application-explorer', [
            'applications' => $applications,
            'selectedApp'  => $selectedApp,
            'documents'    => $documents,
        ]);
    }
}
Update the View
To update the view, open resources/views/livewire/application-explorer.blade.php and add the below code,
<div class="container-fluid vh-100">
    <div class="row h-100">
        {{-- Sidebar --}}
        <div class="col-3 border-end bg-light p-0 overflow-auto">
            <div class="p-3 border-bottom"><h5 class="mb-0">Applications</h5></div>
            <ul class="list-group list-group-flush">
                @foreach($applications as $app)
                    @include('livewire.partials.sidebar-app', ['app' => $app, 'level' => 0])
                @endforeach
            </ul>
        </div>

        {{-- Right Pane --}}
        <div class="col-9 p-4">
            @if($selectedApp)
                <div class="d-flex justify-content-between align-items-center mb-3">
                    <h4 class="mb-0">Documents in "{{ $selectedApp->name }}"</h4>
                    <div class="d-flex gap-2 align-items-center" style="width:50%;">
                        <select class="form-select w-auto" wire:model="filterType">
                            <option value="">All Types</option>
                            <option value="invoice">Invoice</option>
                            <option value="report">Report</option>
                            <option value="letter">Letter</option>
                        </select>
                        <input type="text" class="form-control" placeholder="Search..." wire:model.debounce.300ms="search">
                    </div>
                </div>

                @if($documents->count())
                    <div class="table-responsive">
                        <table class="table table-striped table-bordered align-middle">
                            <thead class="table-dark">
                                <tr>
                                    <th>#</th>
                                    <th>Document</th>
                                    <th>Type</th>
                                    <th>Created</th>
                                    <th>Actions</th>
                                </tr>
                            </thead>
                            <tbody>
                                @foreach($documents as $i => $doc)
                                    <tr>
                                        <td>{{ $i + 1 }}</td>
                                        <td>📄 {{ $doc->title }}</td>
                                        <td>{{ $doc->type ?? '-' }}</td>
                                        <td>{{ $doc->created_at->format('d M Y') }}</td>
                                        <td><button class="btn btn-sm btn-primary">View</button></td>
                                    </tr>
                                @endforeach
                            </tbody>
                        </table>
                    </div>

                    {{ $documents->links() }}
                @else
                    <div class="text-muted fst-italic">No documents found.</div>
                @endif
            @else
                <div class="text-muted fst-italic">Select an application to view documents.</div>
            @endif
        </div>
    </div>
</div>
For sidebar, create a new file at resources/views/livewire/partials/sidebar-app.blade.php and add the following code,
<li class="list-group-item p-0 d-flex justify-content-between align-items-center">
    <button wire:click="selectApp({{ $app->id }})"
            class="btn flex-grow-1 text-start px-3 py-2 {{ $selectedAppId === $app->id ? 'btn-secondary' : 'btn-light' }}"
            style="padding-left: {{ 12 + ($level * 15) }}px;">
        📁 <span class="ms-2">{{ $app->name }}</span>
    </button>
</li>

@if($app->children->count())
    <ul class="list-group list-group-flush">
        @foreach($app->children as $child)
            @include('livewire.partials.sidebar-app', ['app' => $child, 'level' => $level + 1])
        @endforeach
    </ul>
@endif
Step 4. File Storage Notes
Documents are uploaded to storage/app/public/documents/.... So, make sure that your public link exists:
php artisan storage:linkAlways use:
Storage::disk('public')->exists($path);
Storage::disk('public')->path($path);
This ensures correct behavior since your files are under the public disk.
Step 5. Directory Structure by Document Type
When uploading new documents, if you want to make a directory structure based on document types, you can follow this approach:
$file->store("documents/{$applicationId}/" . strtolower($type), 'public');This automatically creates folders like:
/storage/app/public/documents/3/invoices/file.pdfFinal Result
- Left Sidebar: Displays all applications + nested subfolders.
- Right Pane: Shows searchable, paginated, filterable document table.
Conclusion
And there you have it – a complete file explorer built with Laravel Livewire, featuring a responsive sidebar, real-time search and type-based organization.
This approach not only showcases the power of Livewire for dynamic interfaces but also demonstrates how easily Laravel’s Storage, and Eloquent relationships can come together to create a feature-rich, production-ready document management system.
From here, you can take it even further – add drag-and-drop uploads, access control, file previews, download all files in single zip with complete folder structure or even integrate third-party storage like AWS S3. With this foundation, your Laravel app can handle documents as efficiently as any modern file manager.